Watkins' Viggen Pics and Projects
-
watkins
- Master Standardshifter
- Posts: 15881
- Joined: Sun Jul 01, 2007 12:42 am
- Cars: '08 Saab 9-5 Aero wagon
- Location: Salem, MA
Re: Watkins' Viggen Pics and Projects
Yeah I can always adjust the mount or make a new one. At this point I dont think it will be an issue though
-
theholycow

- Master Standardshifter
- Posts: 16021
- Joined: Tue Jun 24, 2008 1:36 pm
- Cars: '80 Buick LeSabre 4.1 5MT
- Location: Glocester, RI
- Contact:
Re: Watkins' Viggen Pics and Projects
Wait, which bushing is blown?I probably should have angled the mount a bit better, but the tension on the bushing doesnt concern me because it takes up much of the slack of the blown bushing.
1980 Buick LeSabre 4.1L 5MT
Put your car in your sig!
Learn to launch/FAQs/lugging/misused terms: meta-sig
Put your car in your sig!
Learn to launch/FAQs/lugging/misused terms: meta-sig
watkins wrote:Humans have rear-biased AWD. Cows have 4WD
-
potownrob

- Master Standardshifter
- Posts: 7833
- Joined: Sun Jun 05, 2005 11:35 pm
- Cars: '17 CX-5 GT
- Location: Dutchess County
Re: Watkins' Viggen Pics and Projects
i have no idea what's going on right about now
ClutchFork wrote:...So I started carrying a stick of firewood with me and that became my parking brake.
-
watkins
- Master Standardshifter
- Posts: 15881
- Joined: Sun Jul 01, 2007 12:42 am
- Cars: '08 Saab 9-5 Aero wagon
- Location: Salem, MA
Re: Watkins' Viggen Pics and Projects
The small one on the end of the V6 9000 armtheholycow wrote:Wait, which bushing is blown?I probably should have angled the mount a bit better, but the tension on the bushing doesnt concern me because it takes up much of the slack of the blown bushing.
-
theholycow
- Master Standardshifter
- Posts: 16021
- Joined: Tue Jun 24, 2008 1:36 pm
- Cars: '80 Buick LeSabre 4.1 5MT
- Location: Glocester, RI
- Contact:
Re: Watkins' Viggen Pics and Projects
potownrob wrote:i have no idea what's going on right about now

1980 Buick LeSabre 4.1L 5MT
Put your car in your sig!
Learn to launch/FAQs/lugging/misused terms: meta-sig
Put your car in your sig!
Learn to launch/FAQs/lugging/misused terms: meta-sig
watkins wrote:Humans have rear-biased AWD. Cows have 4WD
-
watkins
- Master Standardshifter
- Posts: 15881
- Joined: Sun Jul 01, 2007 12:42 am
- Cars: '08 Saab 9-5 Aero wagon
- Location: Salem, MA
Re: Watkins' Viggen Pics and Projects
Im finally getting in to doing some actual power modifications. Recently I rerouted some vacuum lines to bypass a valve for slightly more rapid spooling. More importantly I shoehorned a shiny new piece of aluminum in behind the bumper.
This is how it all was when I started. Nothing to see.

Bumper off. Its pretty clear that theres 153,000 miles worth of bugs, rocks, and road debris damage to the intercooler. All the nifty black paint has worn off the exposed bottom and most of the fins are bent. This is no good! All those random wires and tubes are for power and ground to the air horns I no longer have and washer fluid for the headlight wipers I also no longer have. Pardon the mess.
All gone! Very easily removed the old one. The lines (hot on the passenger side, cold on the driver side) is pretty obvious. I had to remove the trim around the hoses as well as cut off the mounting ears that they attached to so I had enough room for my new bits.

The new intercooler in place. The top is supported by a strip of metal that is bolted to the mounting points for the aforementioned removed headlight wipers. Its quite rigid, but to minimize vibration, two bolts were threaded into the bottom holes with zipties looped around the oil cooler line below/behind the intercooler. I don't have a shot of the new piping since its nothing special. Both sides consist of a cut down 2 ¼ – 2 inch 90 degree silicone elbow and a short piece of 2 inch aluminum tube. Everything is held in place with T bolt clamps.
Everything bolted back up. I would have loved to have the intercooler down in the bumper opening more, but that would have involved a ton of piping (money), relocating the oil cooler, and a lot of time fabricating brackets instead of using a single strip of metal.
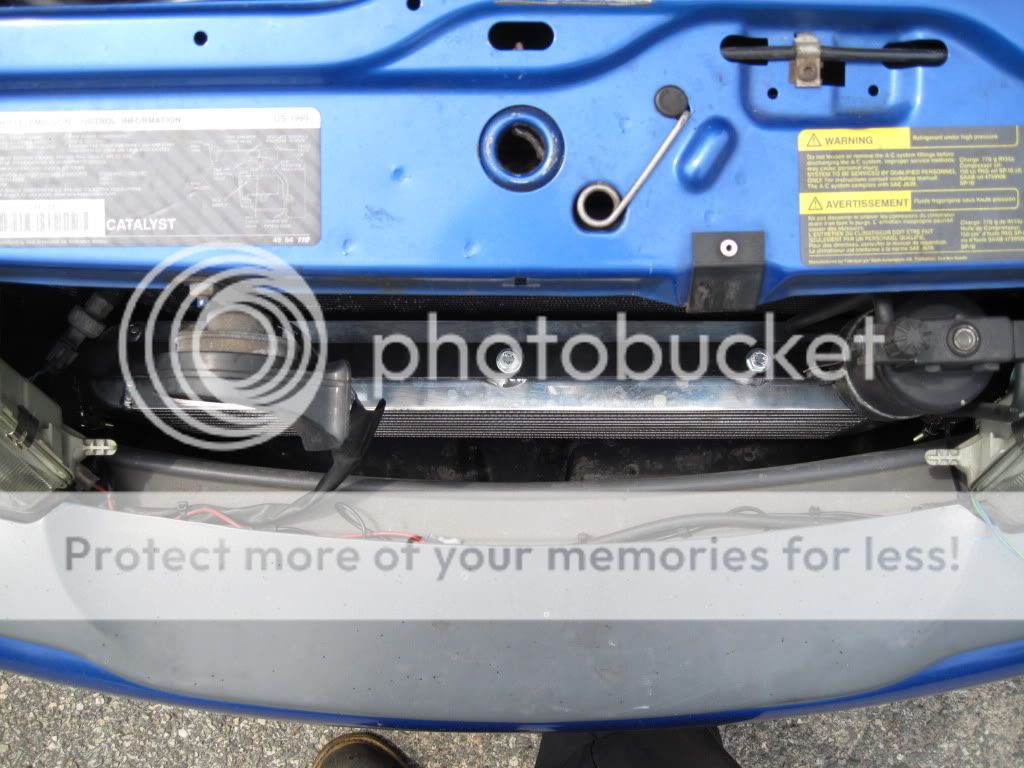
I decided to go an extra step with the install and force the air that enters the bumper opening to go through the intercooler rather than finding any way around it. The first part was to keep air from going above it.

Simple enough. I happen to have a big sheet of 3/4” insulation foam hanging around, so I cut a piece to fit between the bumper and the intercooler mount. Its a friction fit, so there wouldn't be any brackets or anything else to worry about. I used magic to spray paint the styrofoam-like product black (pink would have been tacky) before final installation. Next time I have the car in the air/on ramps/whatever, Im going to work on more ducting on the sides and bottom that Ill squeeze in from below.
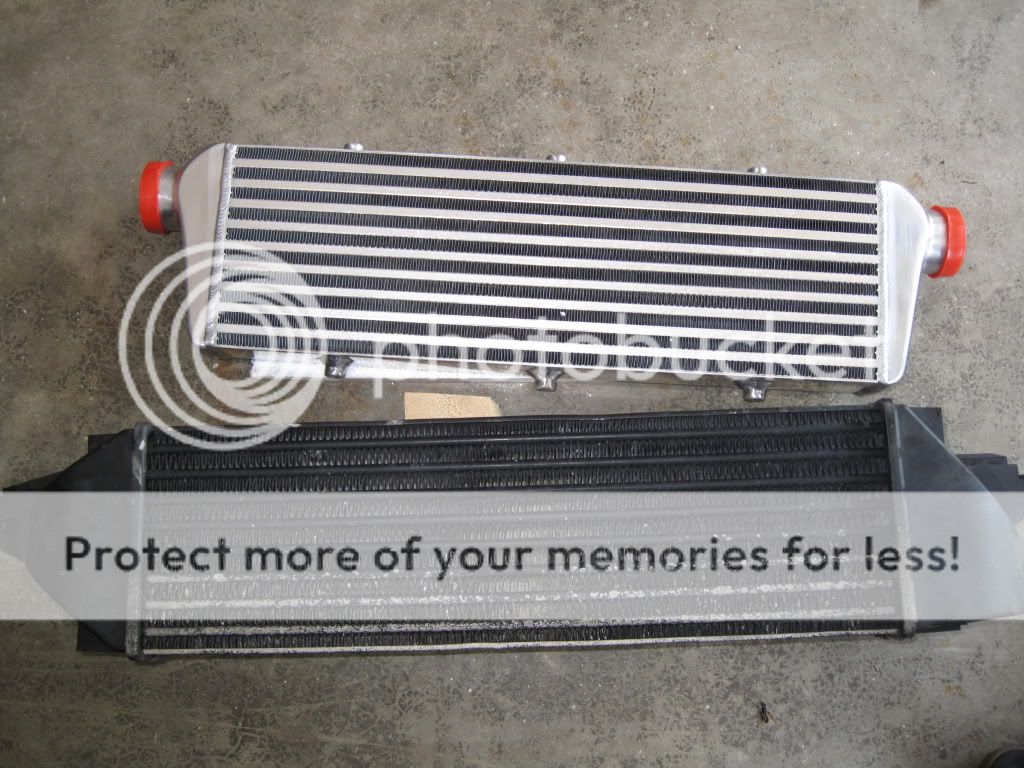
Heres a comparison shot of the new and old. The new one is much shorter, but it is both taller and thicker. Its also bar and plate rather than the original tube and fin, so flow is much better.
Having done some driving since the installation nearly a week ago I can say that the difference is incredible. Intake air temps used to be about 30 degrees above ambient or higher during normal driving. Often the difference was significantly more. Intake temperatures are now down around 20 degrees above ambient. The worst Ive seen so far was 24 above. Because of this the car pulls harder for much longer. Heat soak should no longer be an issue, as it was to a significant extent with the factory intercooler.
This is how it all was when I started. Nothing to see.
Bumper off. Its pretty clear that theres 153,000 miles worth of bugs, rocks, and road debris damage to the intercooler. All the nifty black paint has worn off the exposed bottom and most of the fins are bent. This is no good! All those random wires and tubes are for power and ground to the air horns I no longer have and washer fluid for the headlight wipers I also no longer have. Pardon the mess.
All gone! Very easily removed the old one. The lines (hot on the passenger side, cold on the driver side) is pretty obvious. I had to remove the trim around the hoses as well as cut off the mounting ears that they attached to so I had enough room for my new bits.
The new intercooler in place. The top is supported by a strip of metal that is bolted to the mounting points for the aforementioned removed headlight wipers. Its quite rigid, but to minimize vibration, two bolts were threaded into the bottom holes with zipties looped around the oil cooler line below/behind the intercooler. I don't have a shot of the new piping since its nothing special. Both sides consist of a cut down 2 ¼ – 2 inch 90 degree silicone elbow and a short piece of 2 inch aluminum tube. Everything is held in place with T bolt clamps.
Everything bolted back up. I would have loved to have the intercooler down in the bumper opening more, but that would have involved a ton of piping (money), relocating the oil cooler, and a lot of time fabricating brackets instead of using a single strip of metal.
I decided to go an extra step with the install and force the air that enters the bumper opening to go through the intercooler rather than finding any way around it. The first part was to keep air from going above it.
Simple enough. I happen to have a big sheet of 3/4” insulation foam hanging around, so I cut a piece to fit between the bumper and the intercooler mount. Its a friction fit, so there wouldn't be any brackets or anything else to worry about. I used magic to spray paint the styrofoam-like product black (pink would have been tacky) before final installation. Next time I have the car in the air/on ramps/whatever, Im going to work on more ducting on the sides and bottom that Ill squeeze in from below.
Heres a comparison shot of the new and old. The new one is much shorter, but it is both taller and thicker. Its also bar and plate rather than the original tube and fin, so flow is much better.
Having done some driving since the installation nearly a week ago I can say that the difference is incredible. Intake air temps used to be about 30 degrees above ambient or higher during normal driving. Often the difference was significantly more. Intake temperatures are now down around 20 degrees above ambient. The worst Ive seen so far was 24 above. Because of this the car pulls harder for much longer. Heat soak should no longer be an issue, as it was to a significant extent with the factory intercooler.
Last edited by watkins on Sun May 29, 2011 10:11 pm, edited 2 times in total.
-
94Corolla5Speed
- Master Standardshifter
- Posts: 6927
- Joined: Sun Apr 20, 2008 5:51 pm
- Cars: 1994 Corolla, 1990 Miata
- Location: Chicago, IL
Re: Watkins' Viggen Pics and Projects
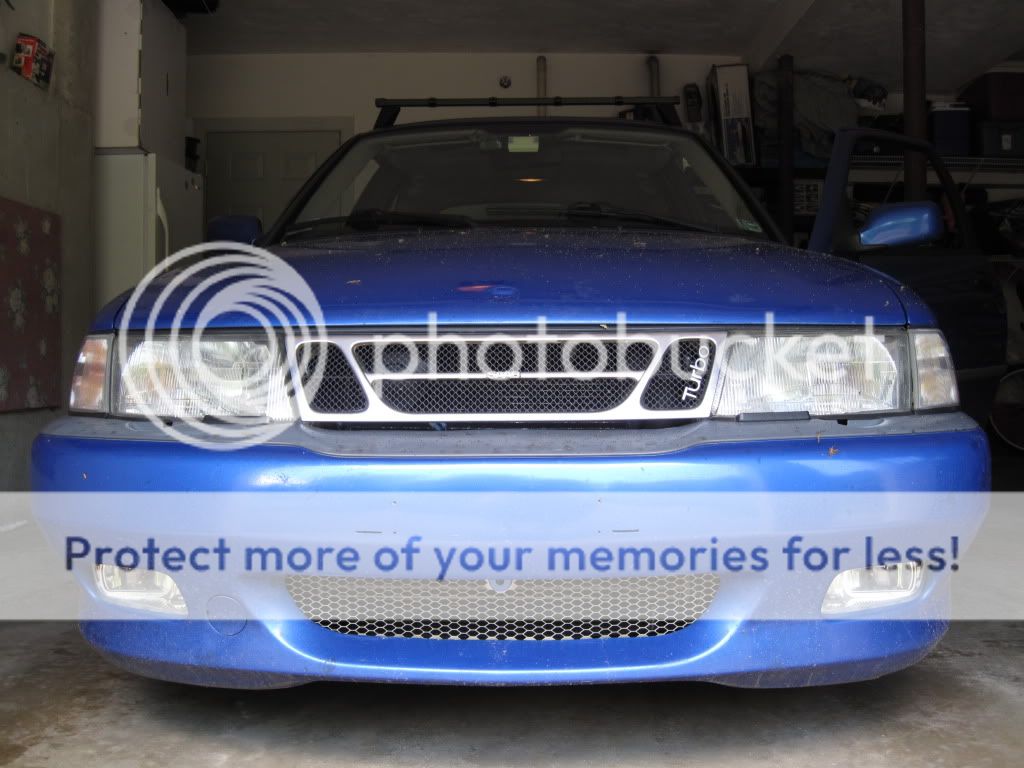
I vote turbo badge to be at the bottom and center of the grille piece.

-
potownrob
- Master Standardshifter
- Posts: 7833
- Joined: Sun Jun 05, 2005 11:35 pm
- Cars: '17 CX-5 GT
- Location: Dutchess County
Re: Watkins' Viggen Pics and Projects
does the intercooler black magic foam insert keep air from getting to the radiator?? sorry, too curious not to ask 

edit: that radiator has seen better days too
edit: that radiator has seen better days too
ClutchFork wrote:...So I started carrying a stick of firewood with me and that became my parking brake.
-
Rope-Pusher
- Master Standardshifter
- Posts: 11612
- Joined: Mon Mar 16, 2009 3:44 pm
- Cars: '08 Jeep Liberty
- Location: Greater Detroit Area
Re: Watkins' Viggen Pics and Projects
Ficksetwatkins wrote:
Bumper off. Its pretty clear that there's 152,972 bugs in the intercooler.
'08 Jeep Liberty 6-Speed MT - "Last of the Mohicans"
-
watkins
- Master Standardshifter
- Posts: 15881
- Joined: Sun Jul 01, 2007 12:42 am
- Cars: '08 Saab 9-5 Aero wagon
- Location: Salem, MA
Re: Watkins' Viggen Pics and Projects
Nope. Its not really in the way of anything. A lot of air goes through above it from the grille. The bottom half still gets the post-intercooler air. Yes, that's warmer than the air up top, but its still cooler than the coolant.potownrob wrote:does the intercooler black magic foam insert keep air from getting to the radiator?? sorry, too curious not to ask
-
watkins
- Master Standardshifter
- Posts: 15881
- Joined: Sun Jul 01, 2007 12:42 am
- Cars: '08 Saab 9-5 Aero wagon
- Location: Salem, MA
Re: Watkins' Viggen Pics and Projects

Im one festive son of a gun.
-
potownrob
- Master Standardshifter
- Posts: 7833
- Joined: Sun Jun 05, 2005 11:35 pm
- Cars: '17 CX-5 GT
- Location: Dutchess County
Re: Watkins' Viggen Pics and Projects
WINNING!! 
edit: i dare you to rock the lights at the next SS meet
edit: i dare you to rock the lights at the next SS meet
ClutchFork wrote:...So I started carrying a stick of firewood with me and that became my parking brake.
-
watkins
- Master Standardshifter
- Posts: 15881
- Joined: Sun Jul 01, 2007 12:42 am
- Cars: '08 Saab 9-5 Aero wagon
- Location: Salem, MA
Re: Watkins' Viggen Pics and Projects
They have to come off to use the rack and I doubt ill have interest in putting them back on before next december
-
AHTOXA

- Master Standardshifter
- Posts: 14693
- Joined: Sun Dec 23, 2007 6:31 pm
- Cars: '19 4RUNNER TRD ORP
- Location: Irving, TX
Re: Watkins' Viggen Pics and Projects
Nice. Someone suggested that I put that stupid raindeer nose and antlers on my jeep. I mentally tortured them in the most heinous ways.
'19 Toyota 4Runner TRD ORP
'12 Suzuki V-Strom 650
'12 Suzuki V-Strom 650
-
watkins
- Master Standardshifter
- Posts: 15881
- Joined: Sun Jul 01, 2007 12:42 am
- Cars: '08 Saab 9-5 Aero wagon
- Location: Salem, MA
Re: Watkins' Viggen Pics and Projects
I find those repulsive. The Easter bunny is OK though 