1995 Saturn SC2 - Rebuilt (lots of pictures)

A place to post photos and discuss your car.
User avatar
anmasher
Junior Standardshifter
Posts: 12
Joined: Sat May 11, 2013 9:16 pm

1995 Saturn SC2 - Rebuilt (lots of pictures)

Post by anmasher »

I've basically driven nothing but Saturn S-Series' the entire time I've been driving. Nothing quite handles like them in my experience, and they are cheap cheap cheap cars to keep running forever. The one I had been driving had the almighty PRND32 though - nothing wrong with it, just once you've shifted into D your work was done. That's boring. Late 2012 I decided it was time to do something about it. Either hit up a junkyard and swap out my automatic transmission and associated parts for a manual or just get another already equipped with the 5 speed. Having multiple cars is very nice because it takes off the pressure when one develops a problem - so another Saturn was the decision. Around Christmas the ideal candidate popped up on Craigslist. It was a 1995 SC2 almost fully loaded, with a 5 speed and the price was very cheap as the engine had been run low on oil for some time. It made the trip home on December 28th and then the rebuild began a few days later. This is a Saturn 1.9l DOHC engine (LL0).

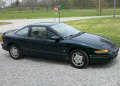
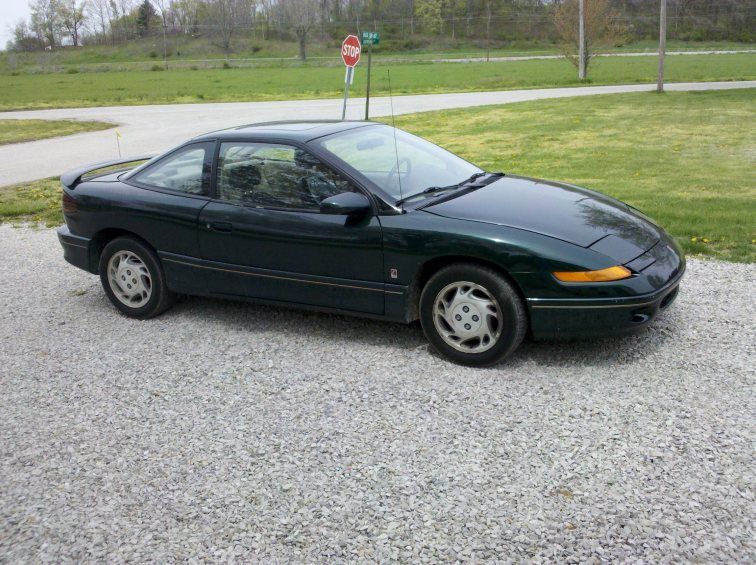
First night in the garage, snow still on the tires.
Image

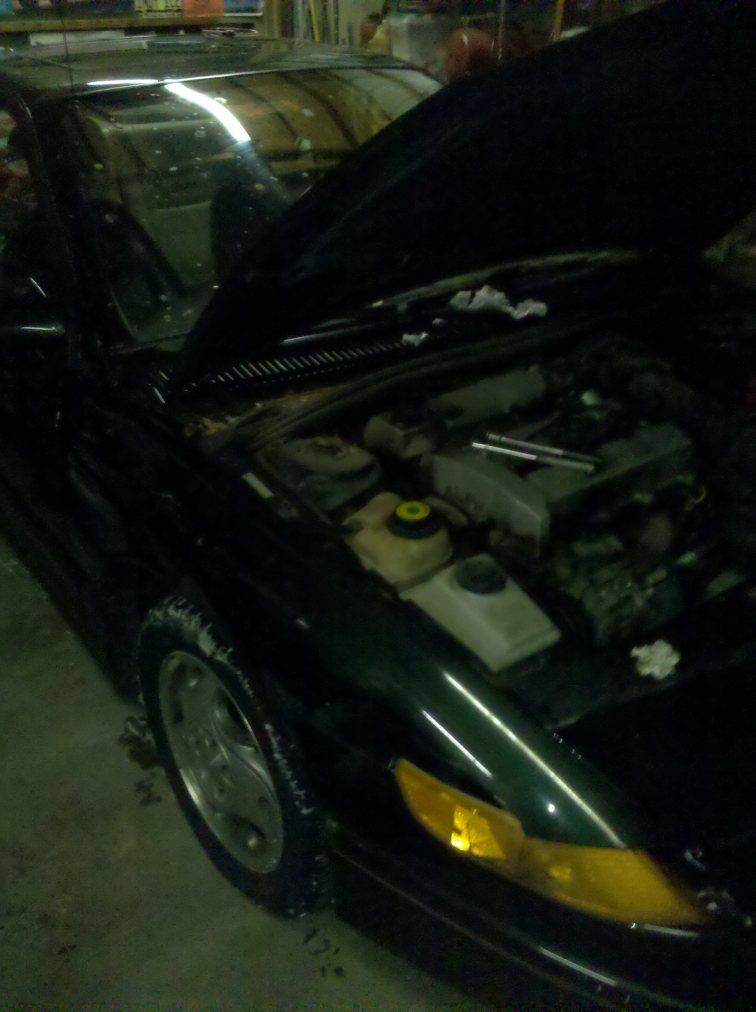
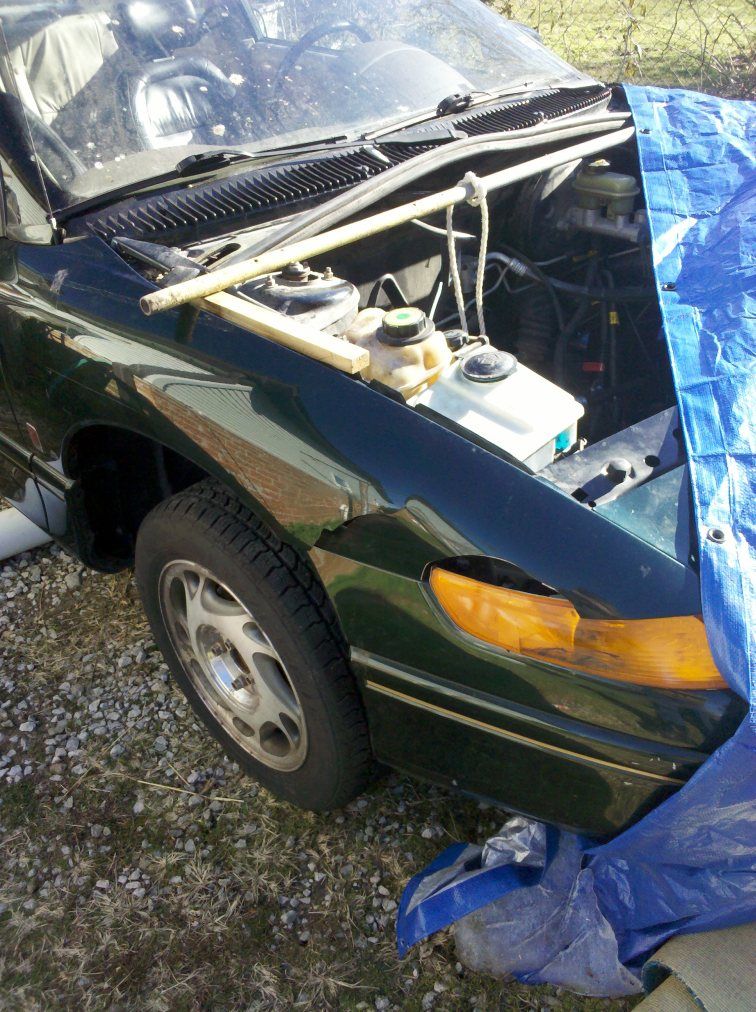
Several days later, back outside sans powertrain. Here you can see the broken quarterpanel and bent cowl(?).
Image

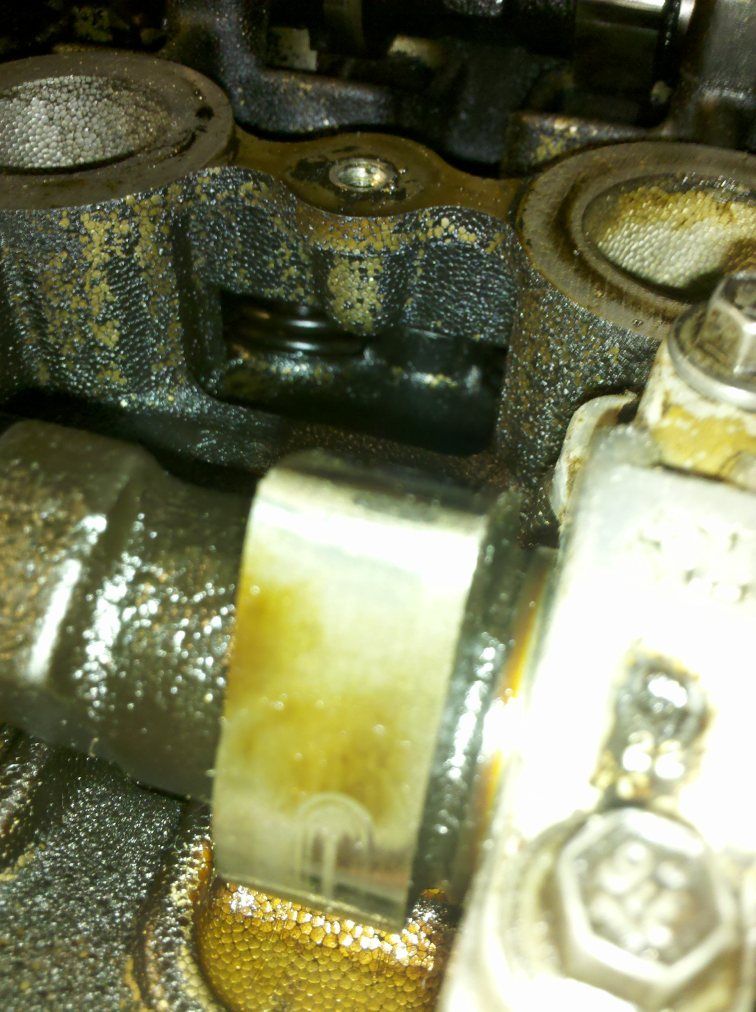
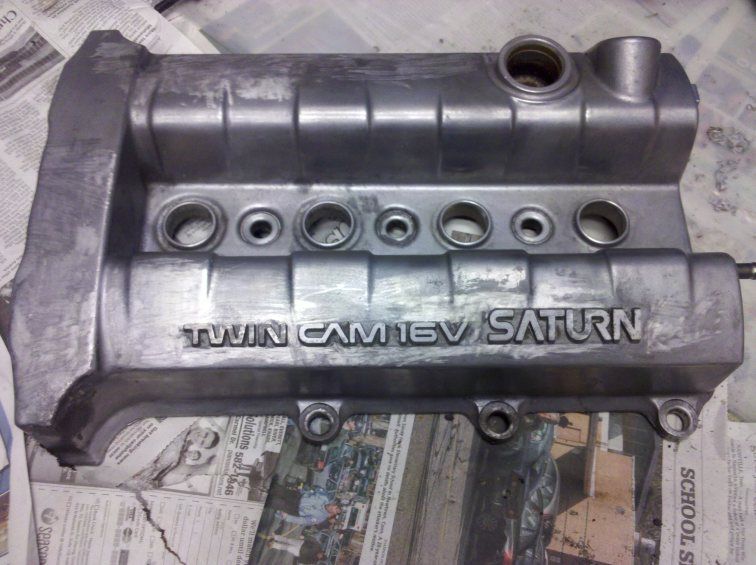
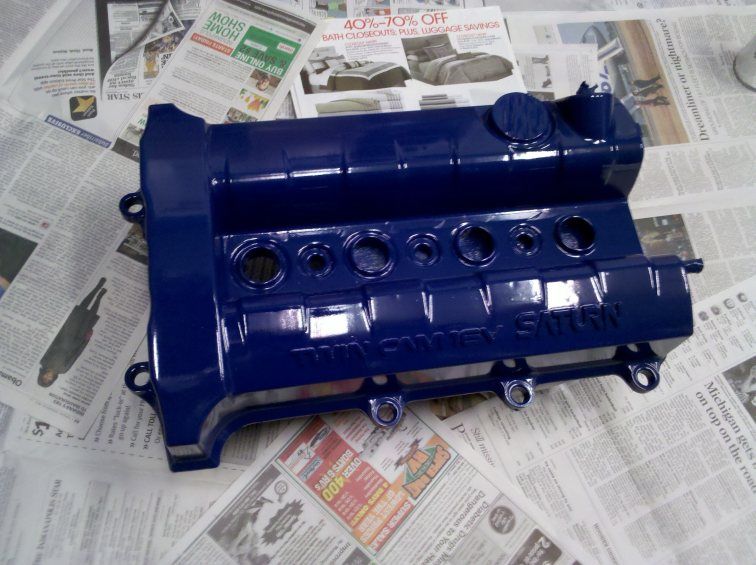
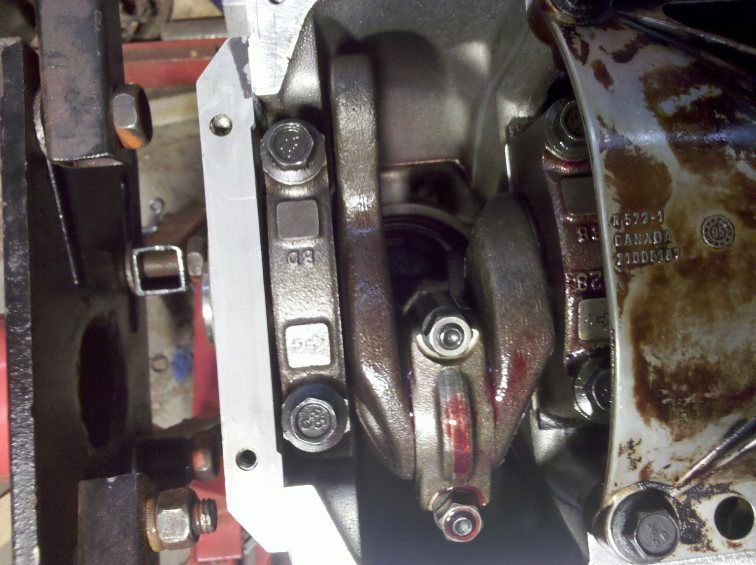
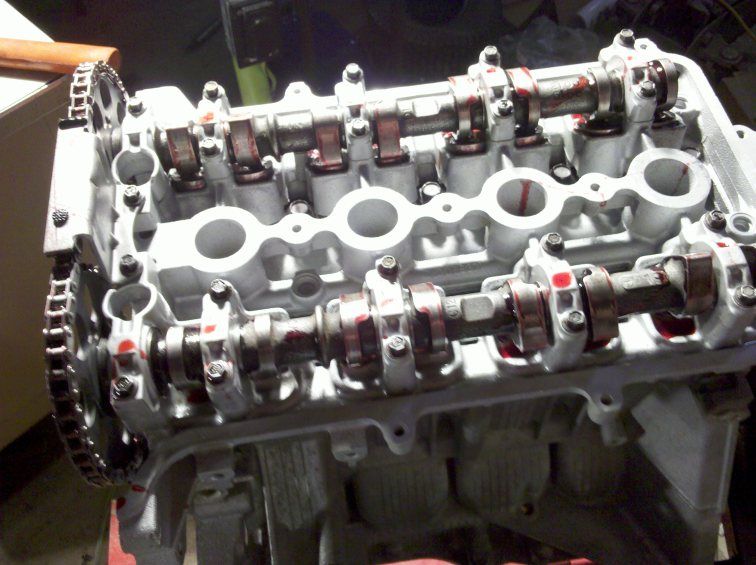
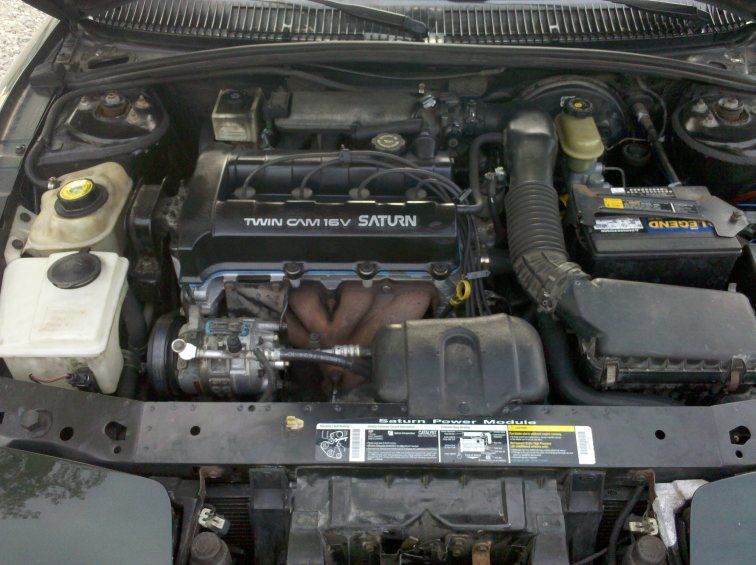
Valve cover removed (earlier, while engine was still in the car) to check out the head. Notice the oil on the exhaust manifold - either the head gasket had failed and was dumping oil out the front, or that gallery was cracked. Cams look alright here.
Image

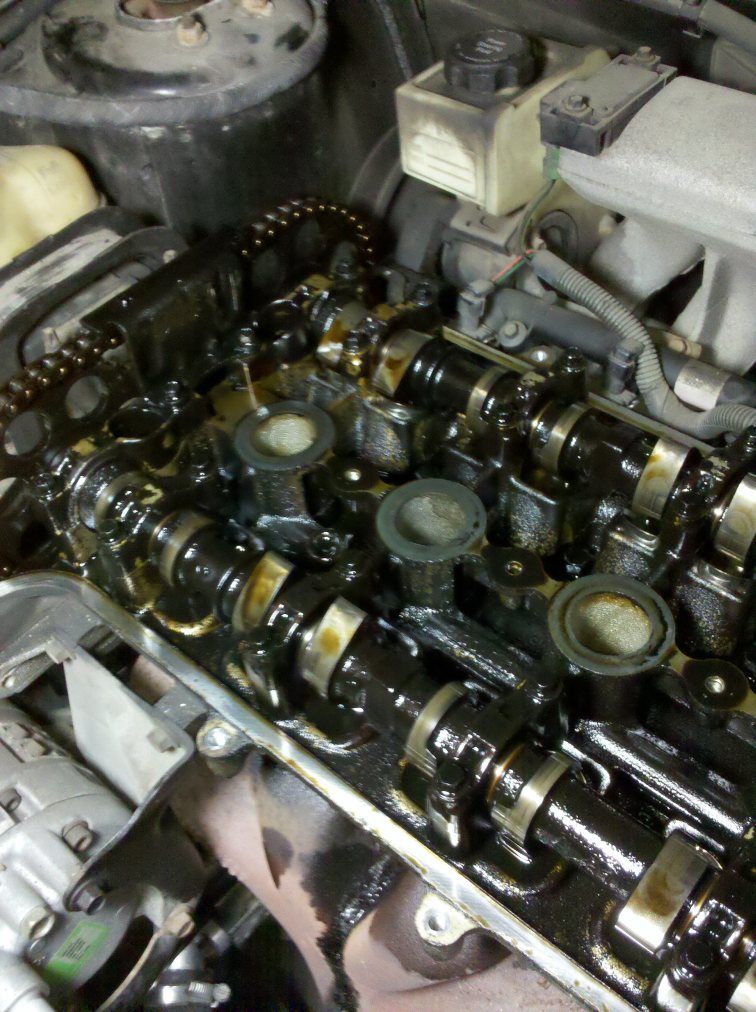
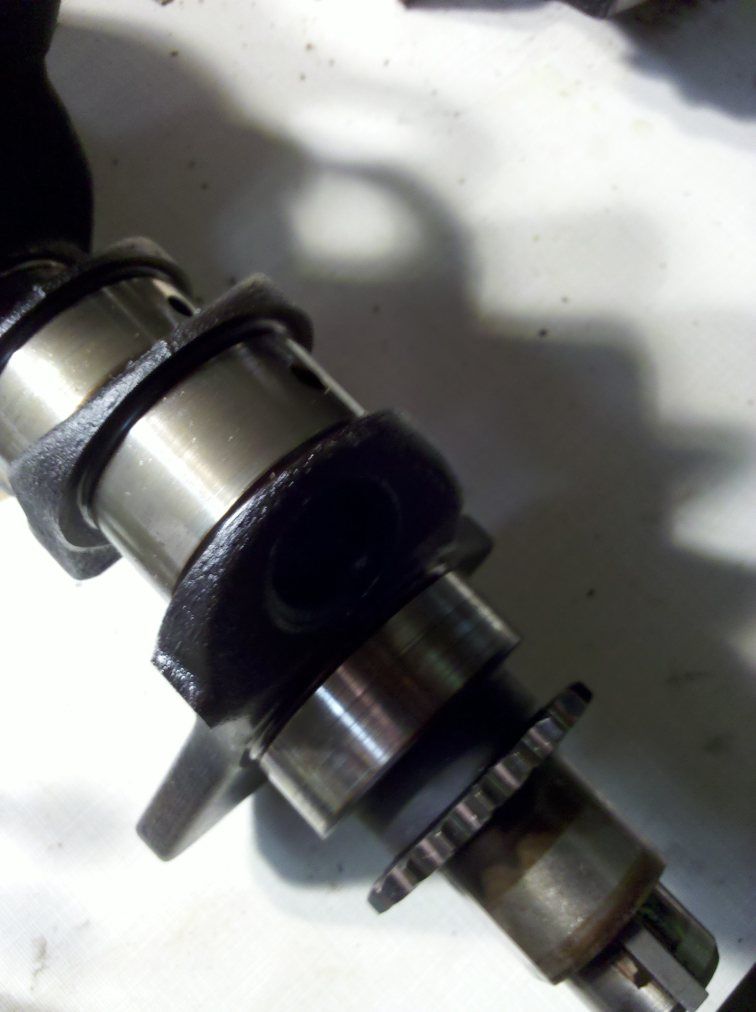
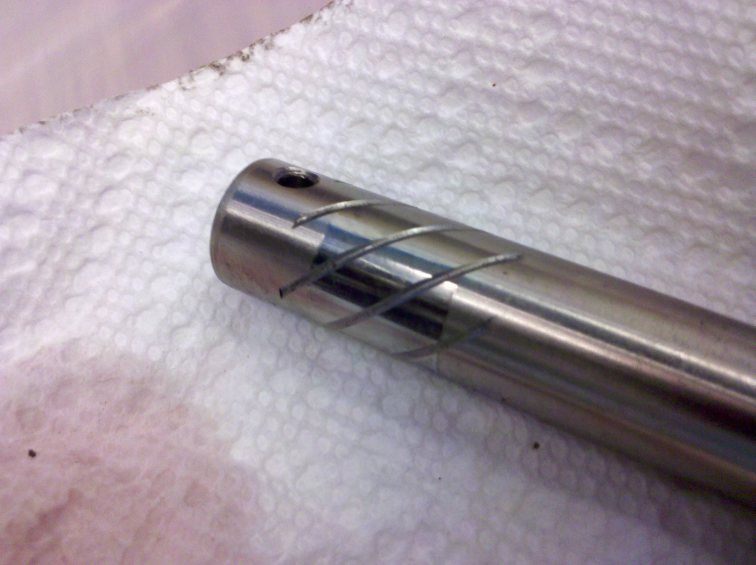
Or not, the cams had unusual and rather severe wear on the lobes.
Image

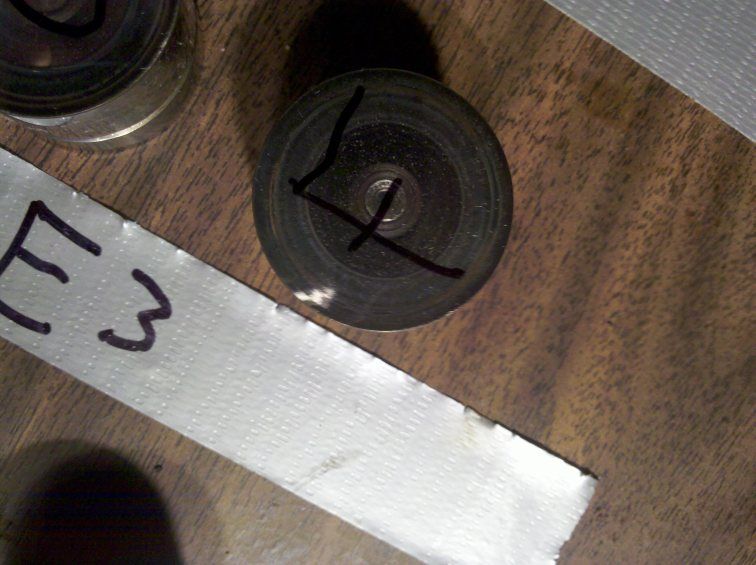
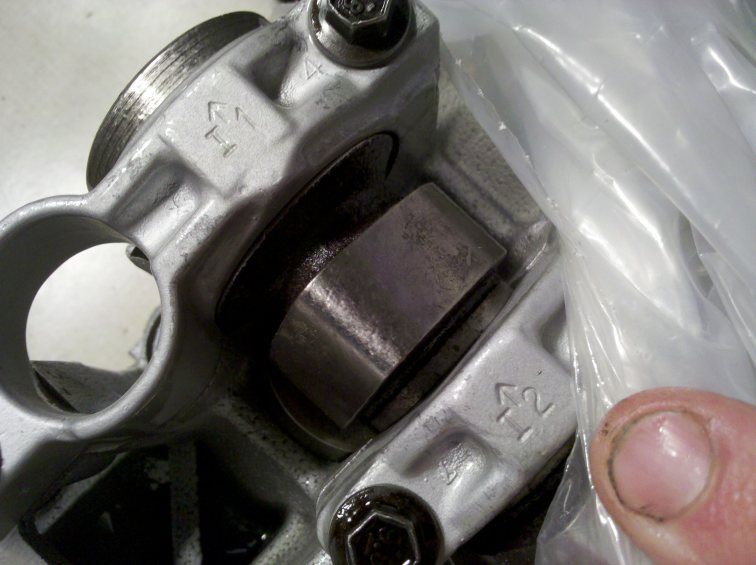
As did the lifters... The oil filter likely bypassed and allowed metal chips to flow freely through this engine.
Image

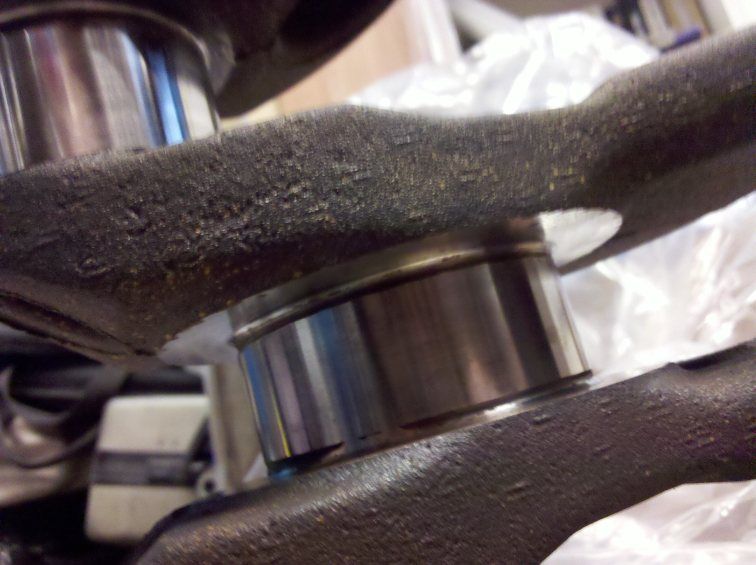
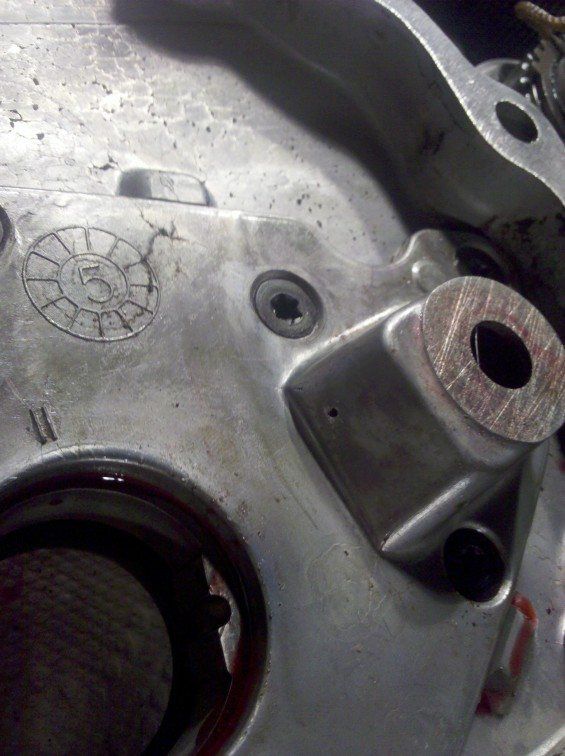
Scoring on the cam journals. I would almost reuse these, if this were going to be a quick and dirty rebuild.
Image

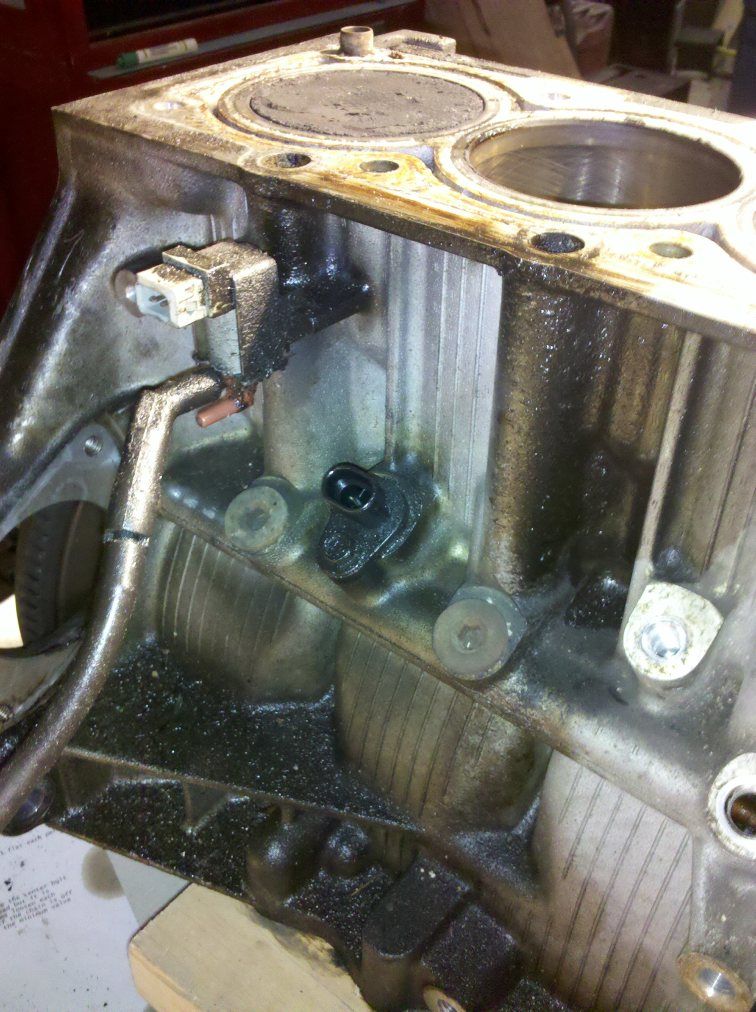
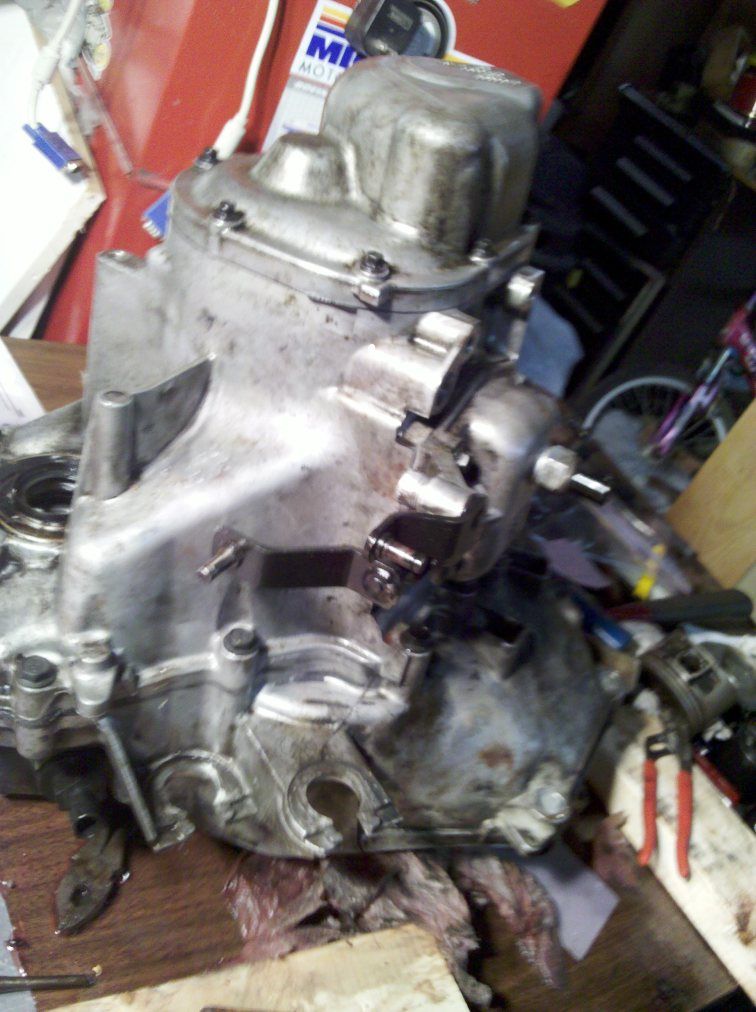
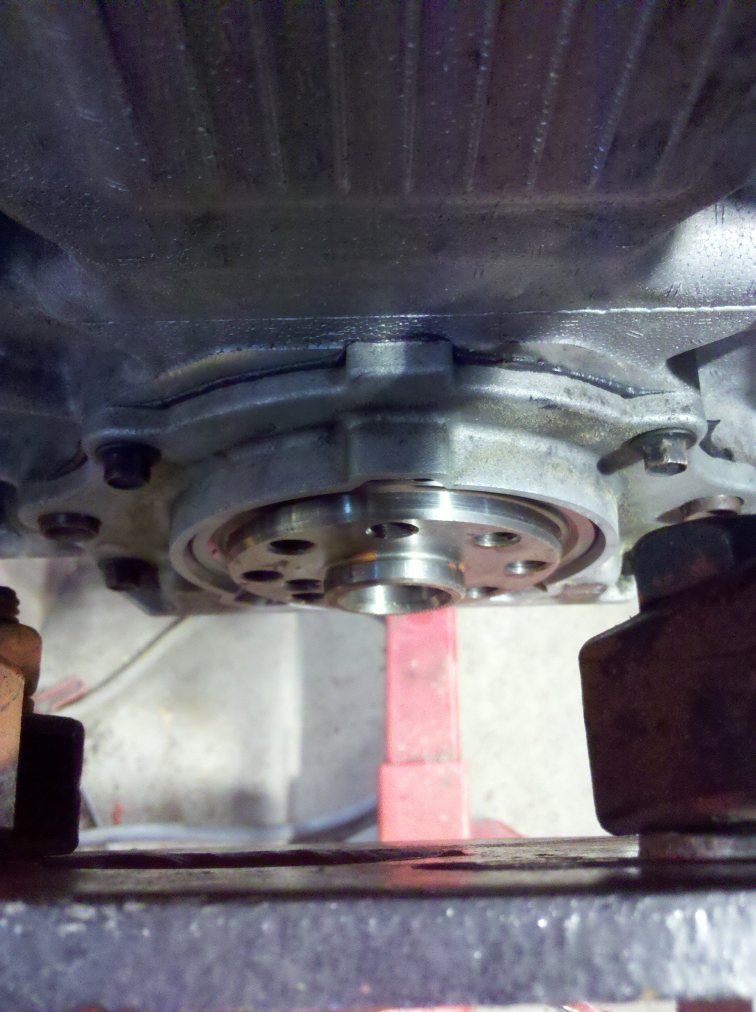
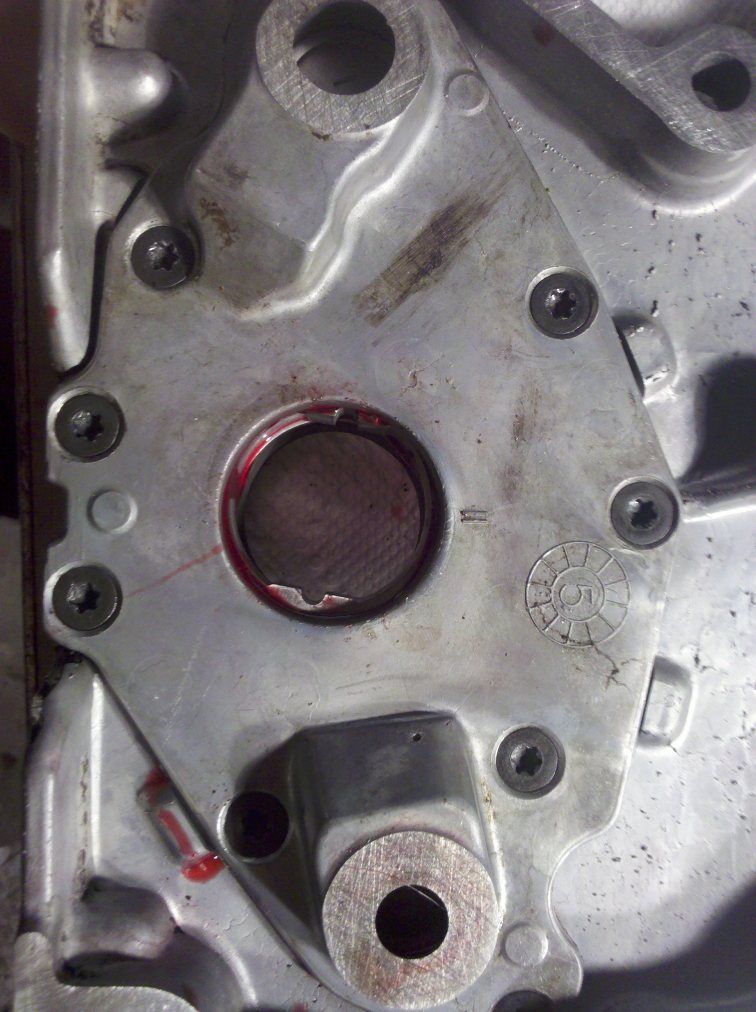
Greasy back of the block. Head and timing set removed.
Image

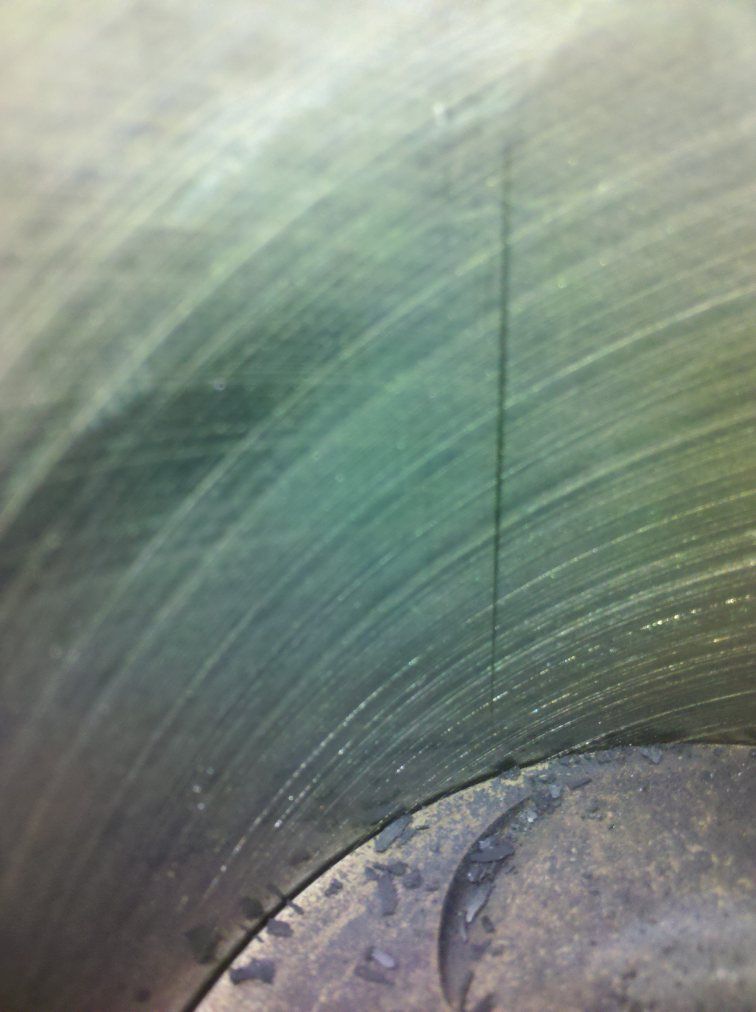
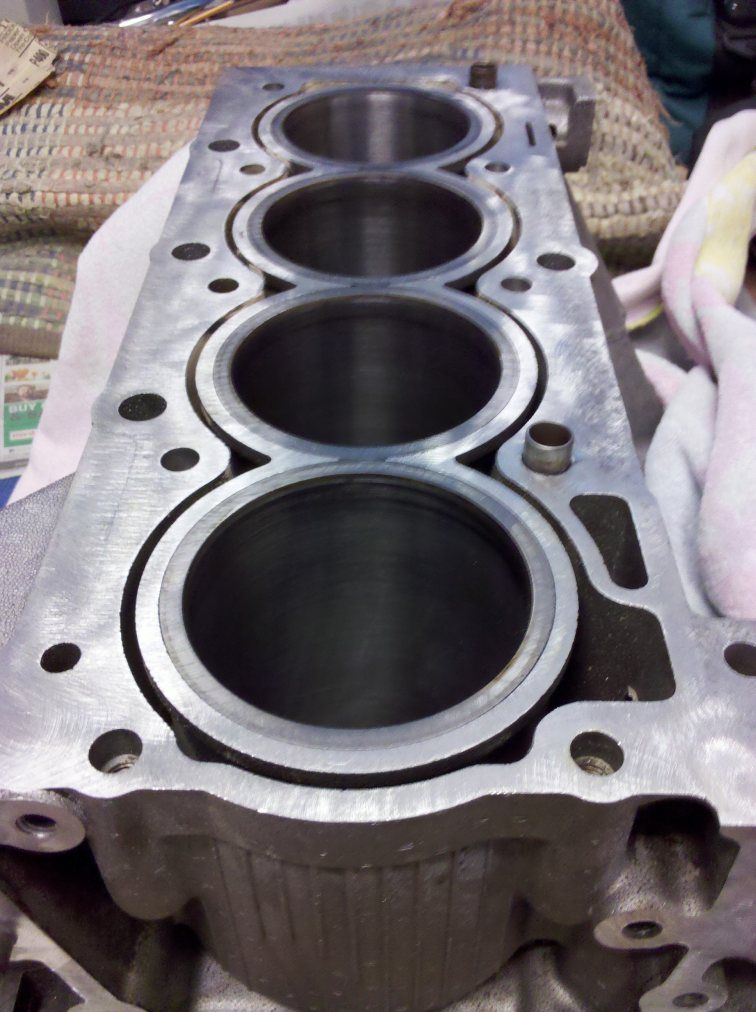
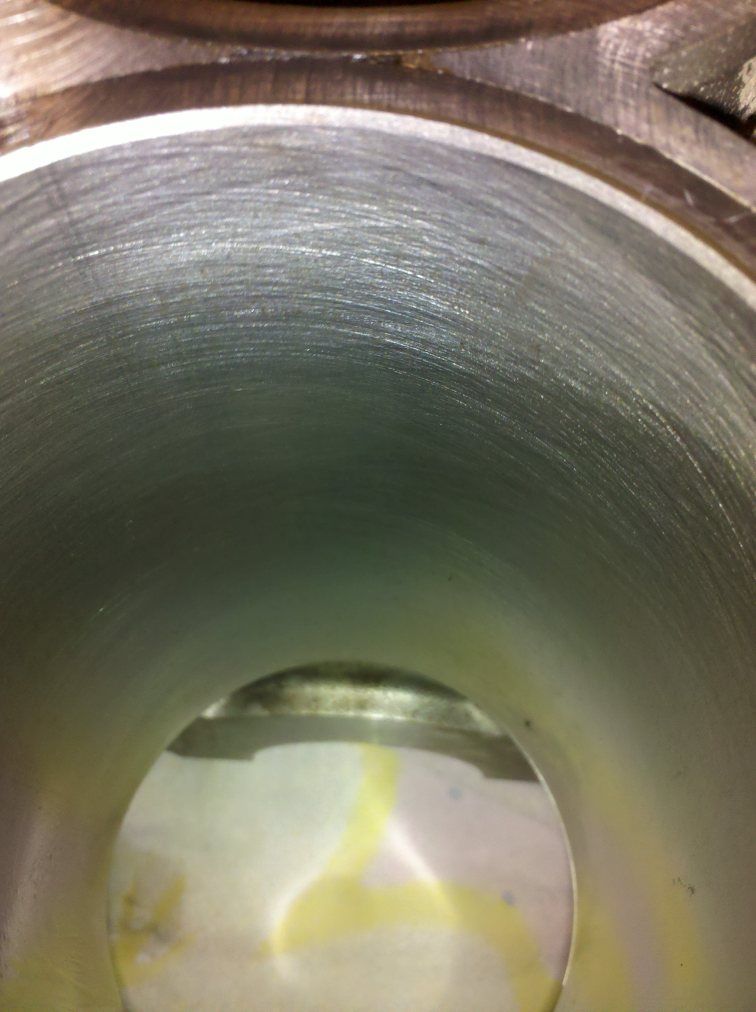
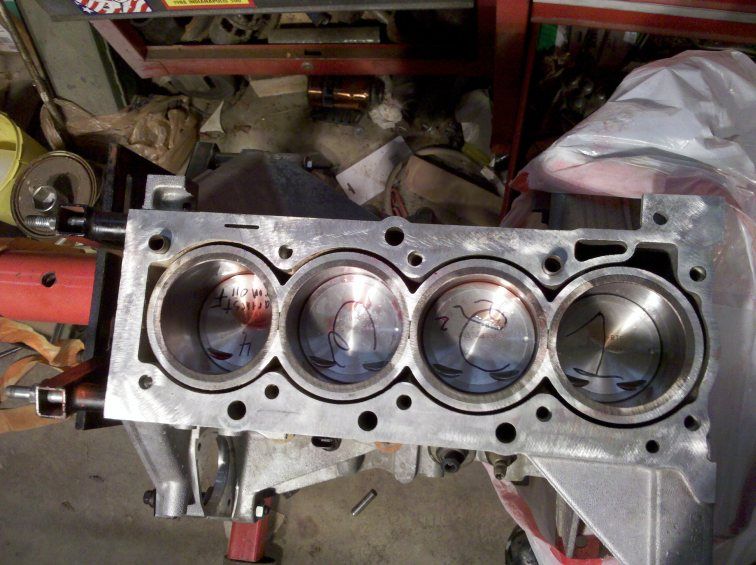
Number 3 cylinder with the largest scar. All cylinders were out of round by .0005"
Image

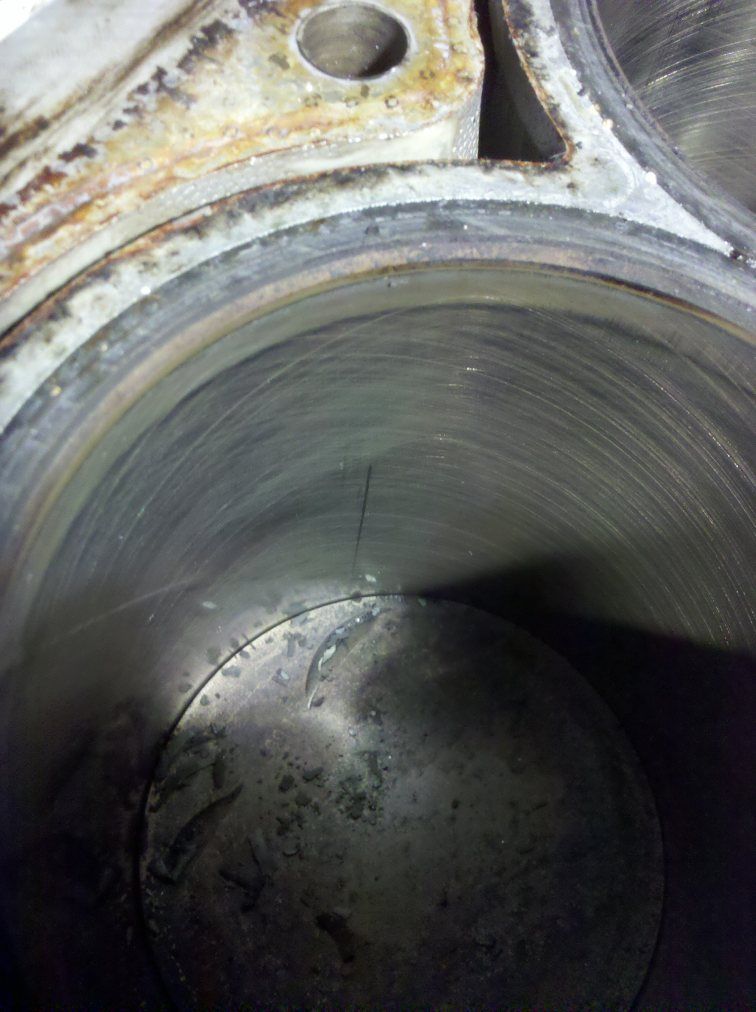
Cross hatching is ~.020" deep, unlike some engines it will always be present.
Image

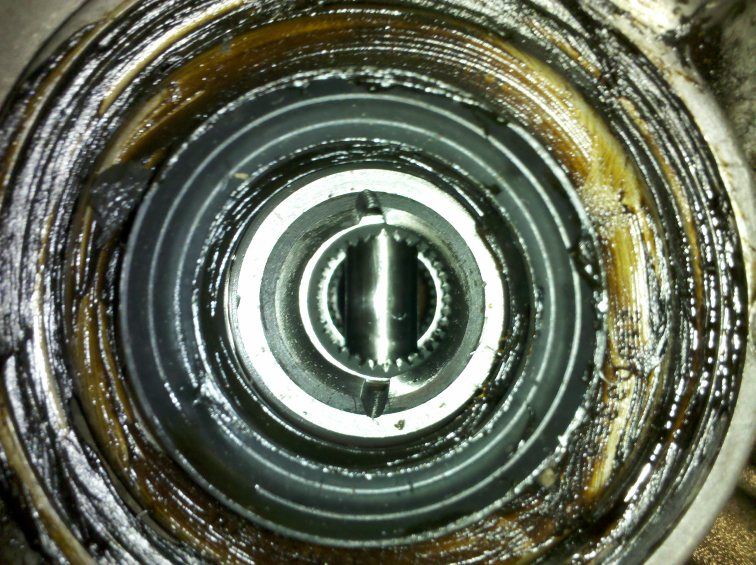
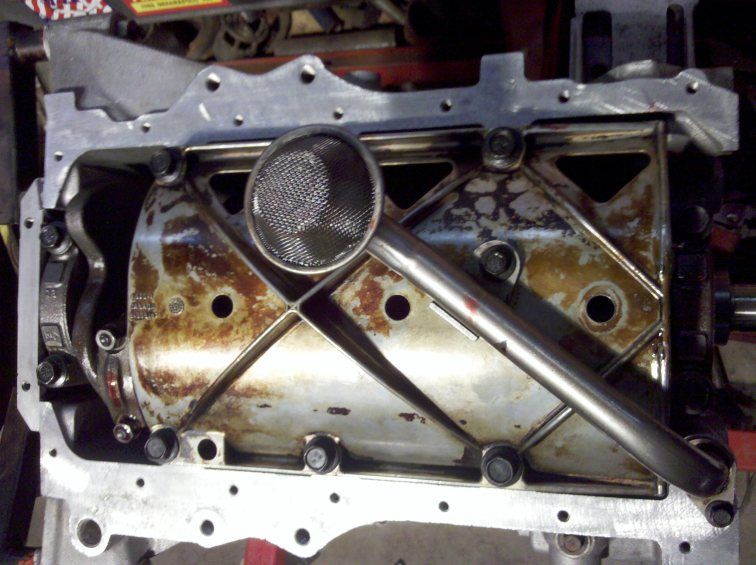
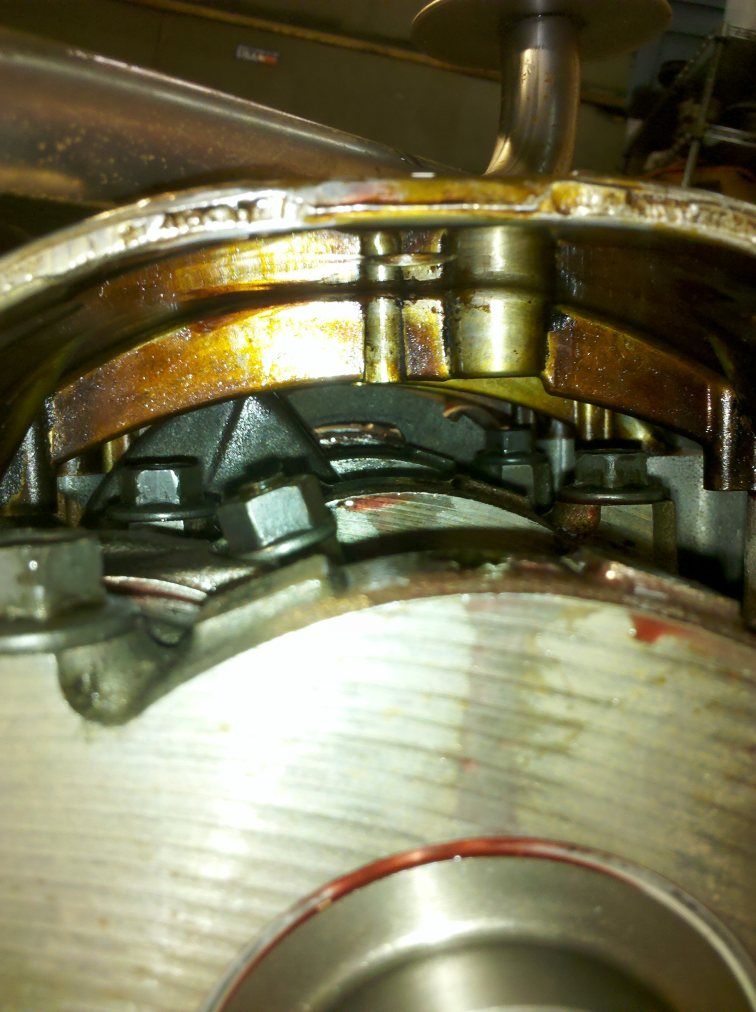
The lower block disassembled. It's near impossible to see in this picture, but the thrust (taken at the #3 main journal between the two counter-weights) is almost completely gone - it had > .030" play.
Image

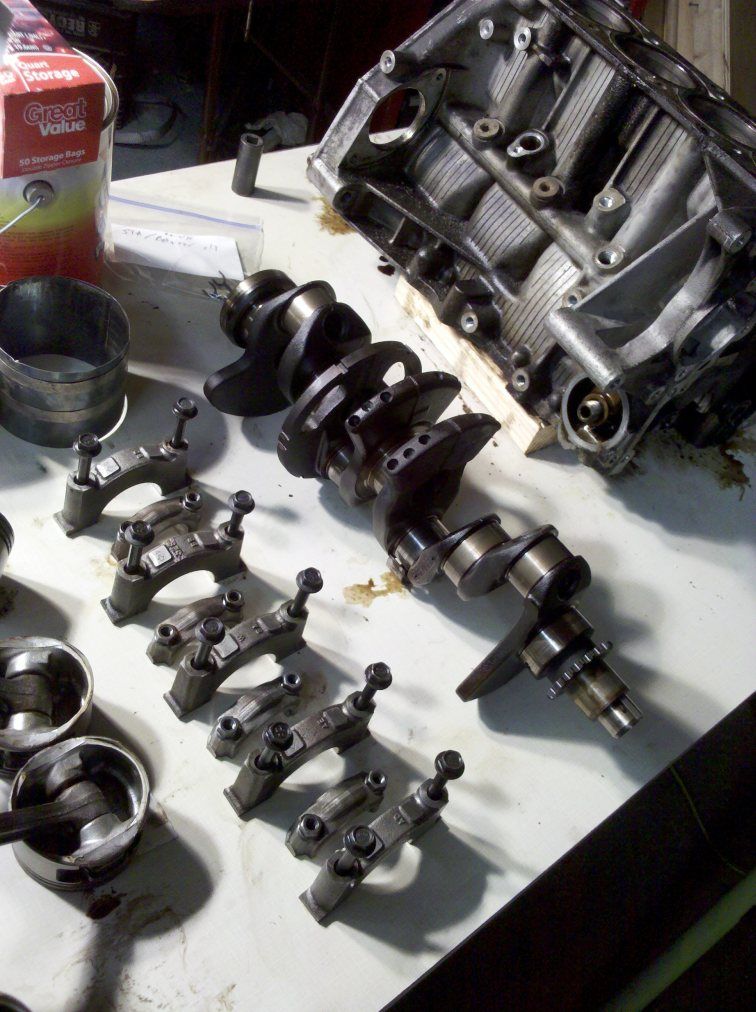
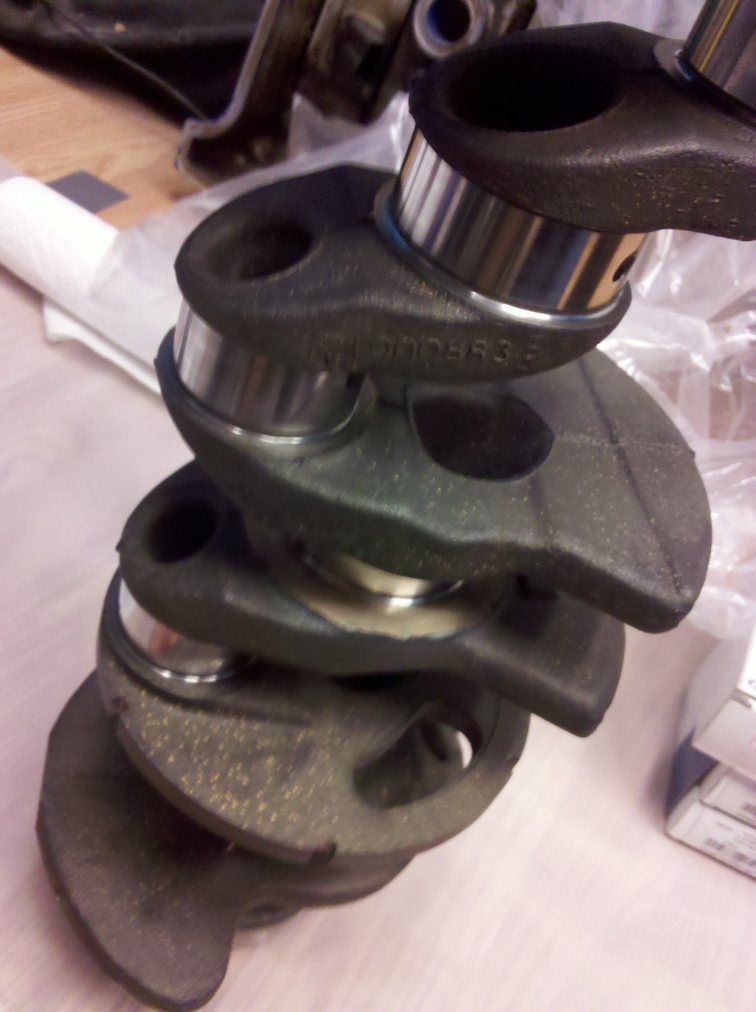
Crankshaft, some scoring on the journals. Only one was severe enough to merit a re-grind.
Image

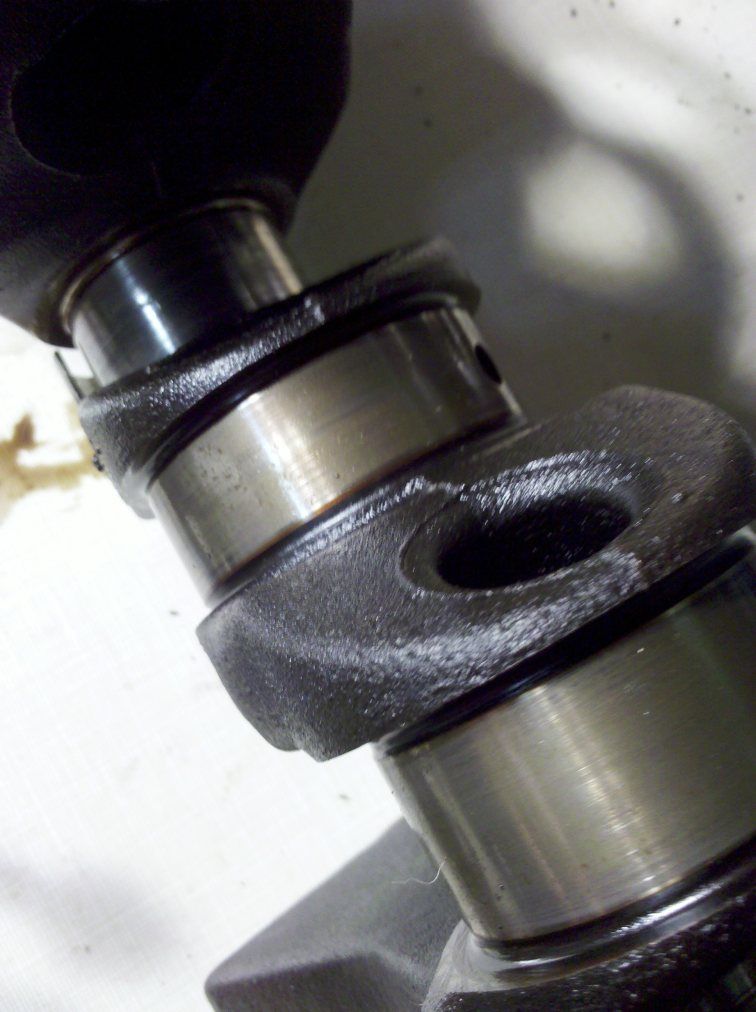
Number 1 main journal had some decent scoring.
Image

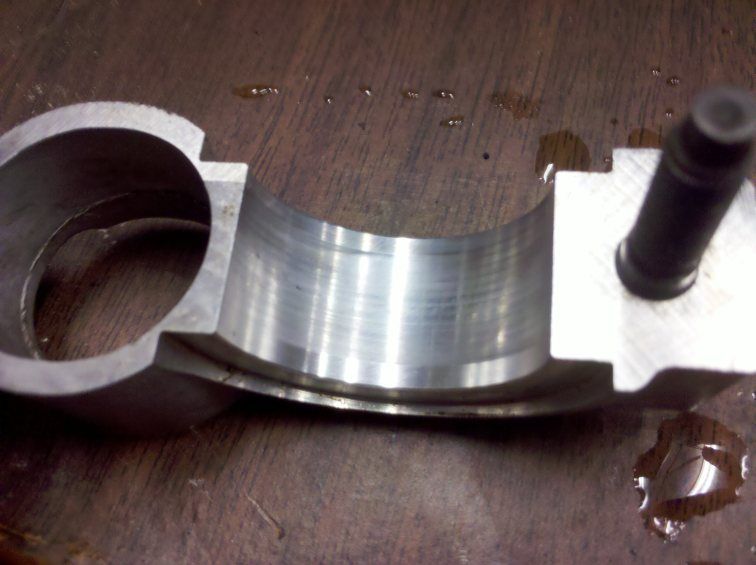
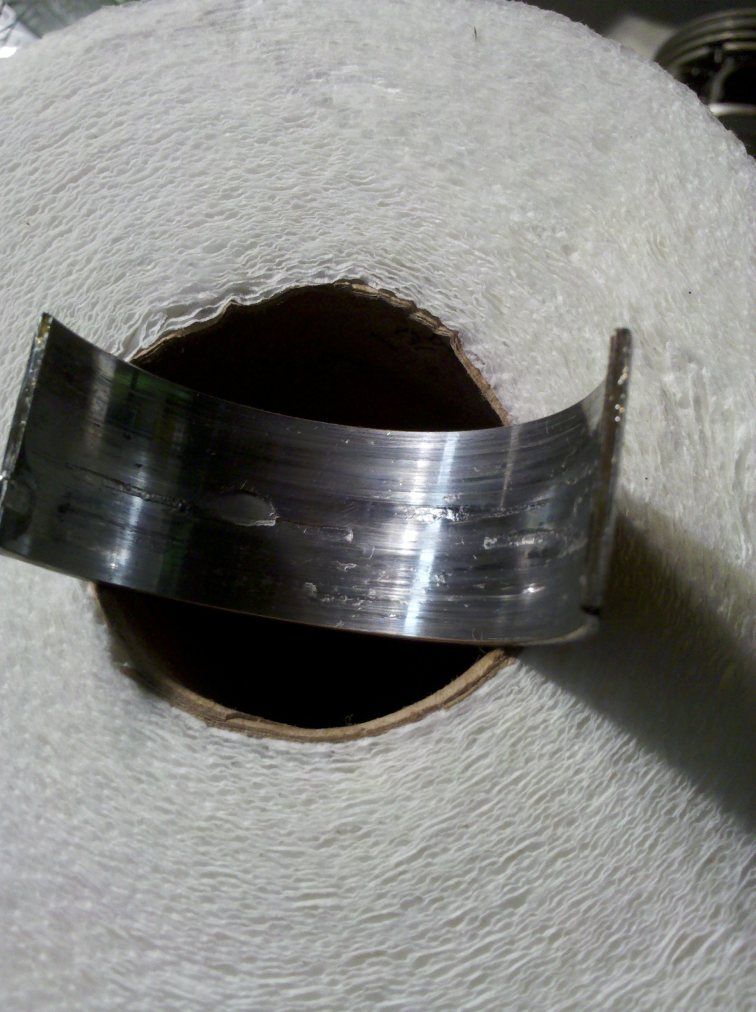
Number 3 rod bearing, cap side. Rod bearings receive oil secondary to (and from) the main bearings, thus damage to rod bearings is almost always more significant than damage to main bearings.
Image

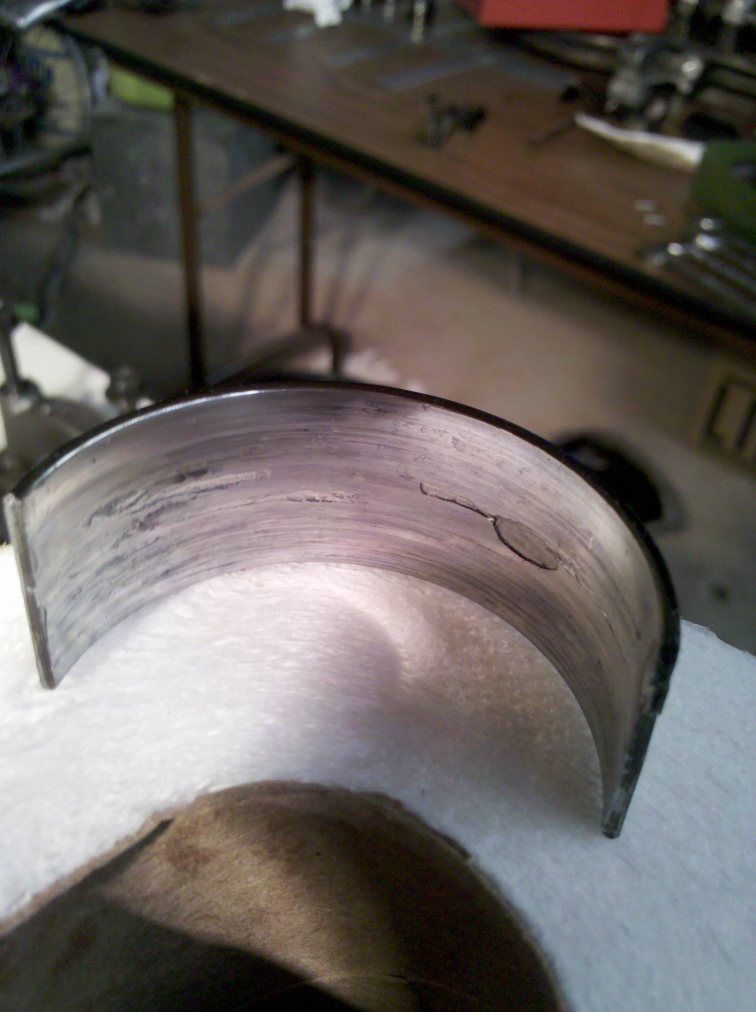
Number 2 (IIRC) rod bearing, cap side.
Image

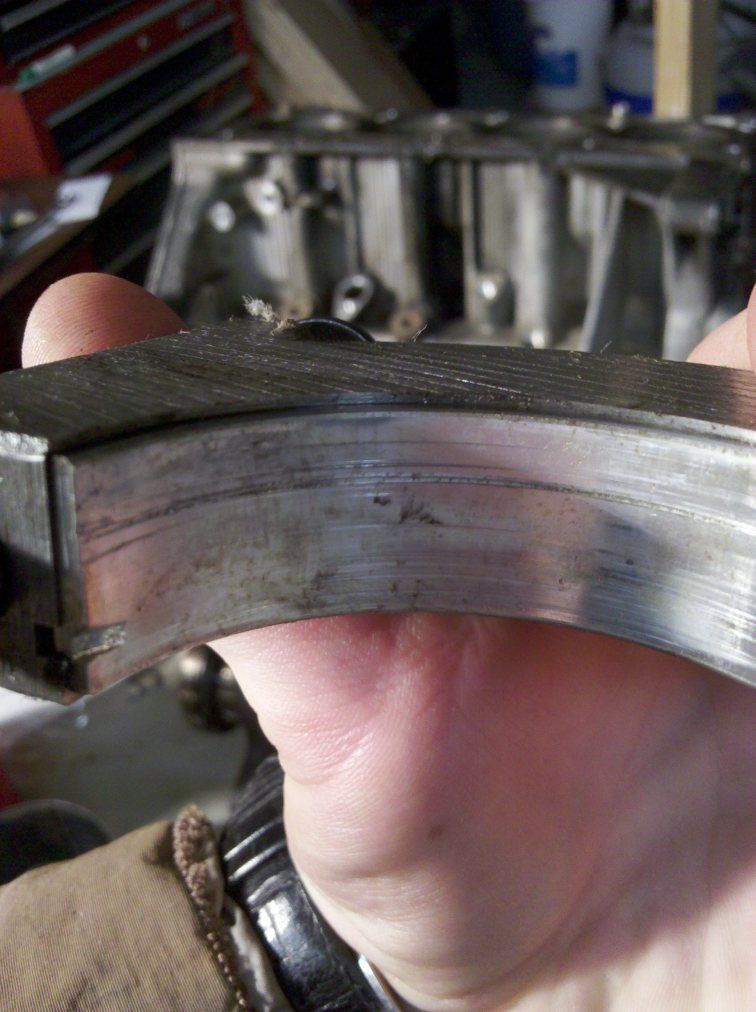
The worst main bearing cap.
Image

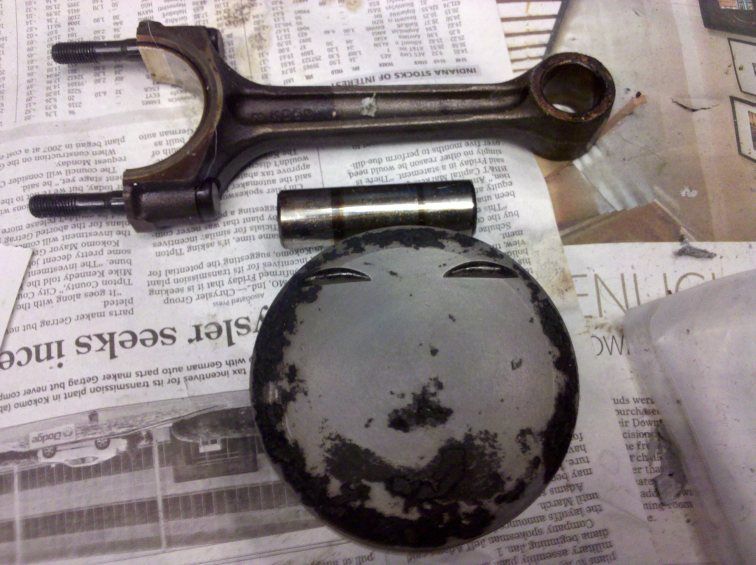
Piston, connecting rod, and wrist pin disassembled.
Image

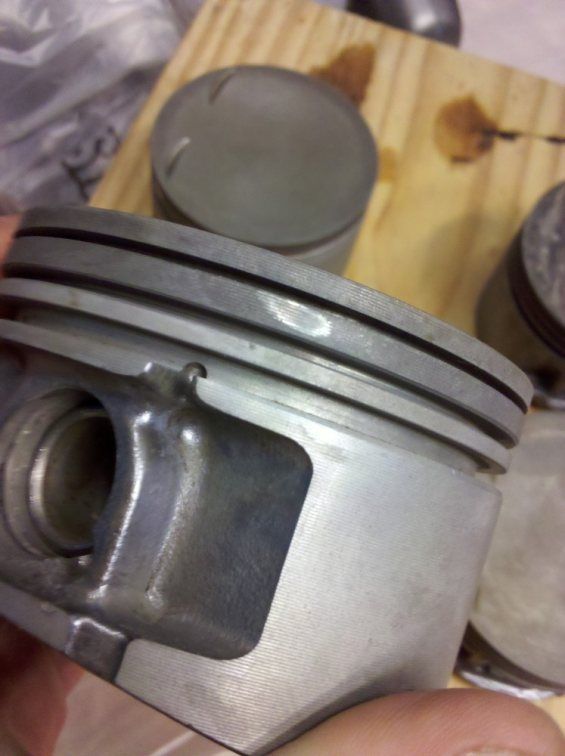
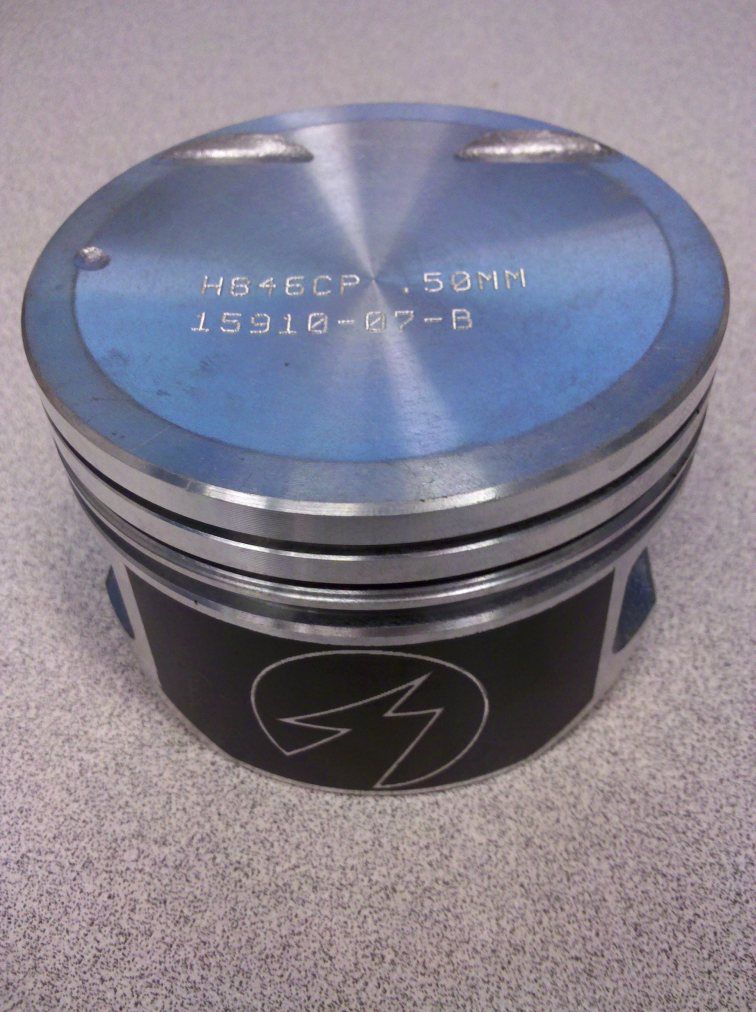
These engines are notorious for burning oil (frequently large quantities) after ~100k miles. This piston was already cleaned, but you can see where the problem lies - the oil drainback holes are tiny dimples in the oil control ring land. The fix is to drill extra drains or use aftermarket pistons. I suspect by the conditions of these pistons this engine was burning 1qt./500 miles.
Image

And the engine is off to the machine shop...
User avatar
anmasher
Junior Standardshifter
Posts: 12
Joined: Sat May 11, 2013 9:16 pm

Re: 1995 Saturn SC2 - Rebuilt (lots of pictures)

Post by anmasher »

Here's the alternator. At 165k miles it wouldn't hurt to rebuild it.
Image

The cam cover. Time to take that nasty flaking, grey paint off.
Image

The cam cover. Freshly painted with blue and clearcoat. This will actually be re-painted later because the clear began to bubble.
Image

These transmissions have somewhat weak differential pins. The differential pin holds the spider gears together, and is itself held in the differential housing by a single roll pin. That roll pin was robotically installed. For the robots to be able to assemble it, the roll pin fits the carrier correctly, but is slightly loose in the differential pin. If it shears and comes out, the entire transmission is destroyed. I drilled out the carrier and pin to 3/16" and installed two 3/16" roll pins instead of the single factory pin. This is the differential pin. For a more detailed and picture filled thread on these differentials, see http://www.saturnfans.com/forums/showth ... ost1973974.
Image

Input/Output shafts.
Image

Reassembled transmission.
Image

Greased axle seals, spider gears, differential pin.
Image
User avatar
anmasher
Junior Standardshifter
Posts: 12
Joined: Sat May 11, 2013 9:16 pm

Re: 1995 Saturn SC2 - Rebuilt (lots of pictures)

Post by anmasher »

The block is home. Cleaned, hot tanked, bored, and honed.
Image

New Sealed Power .5mm oversize pistons - with large oil drains.
Image

New bores and crosshatch.
Image

Freshly ground crankshaft, welded thrust surface.
Image

Thrust surface.
Image

The lower block assembled.
Image

Image

Oil pickup, oil pan baffle, rear main seal carrier.
Image

Image

Image

Image

New rear main seal.
Image

Updated oil pump cover with a hole for oiling the timing chain. I drilled the hole myself instead of ordering a new cover. You must be careful doing this yourself as you can significantly lower oil pressure if you make it too large.
Image

Image

Given the damage to the head, it was easier and cheaper to order a remanufactured head. J&C Enterprises always provides very good quality heads for ~$80 more than a full head job. A worthwhile choice in this case.
Image

Head installed, lubed, and timed.
Image

Image

Flywheel resurfaced. I also had to cut a 1/4", 45° chamfer on the inner edge for clearance with the updated clutch friction discs.
Image

Cutting that chamfer indicated that the flywheel was out of balance, so it was replaced entirely.
Image
User avatar
anmasher
Junior Standardshifter
Posts: 12
Joined: Sat May 11, 2013 9:16 pm

Re: 1995 Saturn SC2 - Rebuilt (lots of pictures)

Post by anmasher »

The interior has been mostly removed so that everything can be thoroughly washed and cleaned. All carpet was shampooed before putting seats back in.
Image

Rear seats cleaned and installed.
Image

Front seats cleaned and installed.
Image

Steering wheel, instruments cluster, etc.
Image

Powertrain on the way back down.
Image

And back in.
Image

The finished car.
Image

Image
User avatar
anmasher
Junior Standardshifter
Posts: 12
Joined: Sat May 11, 2013 9:16 pm

Re: 1995 Saturn SC2 - Rebuilt (lots of pictures)

Post by anmasher »

And finally the parts and cost list.

Initial Purchase: $470

Tools:
  • 29mm deepwell socket - $17
  • Red/Green plastigage - $5
  • Hose for removing/installing rods - $1
  • Berryman's Chem-Dip - $30
  • Engine stand/Load leveler (Craigslist) - $25
  • Piston ring expander - $9
  • Total: $87
Transmission:
  • Dexron III ATF - $13
  • MP2 5th gear - $80
  • Roll pins and new case bolts - $10
  • Gaskets - $13
  • Total: $116
Engine:
  • Sealed Power .5mm Oversize Hyper-eutectic Pistons - $125
  • Hastings Cast Iron Rings - $40
  • MAHLE Clevite Mains and Rod Bearings - $86
  • Crank thrust weld - $75
  • Block hot tanking - $25
  • Crankshaft Grinding - $85
  • Cylinder Boring - $60
  • Sealed Power Oil Pump - $17
  • OEM pieces (oil pickup seal, pressure relief valve, etc.) - $42
  • Victor Reinz Timing Cover Gasket Set - $19.50
  • Fel-Pro EGR Gasket - $3
  • Fel-Pro Rear Main Seal - $16
  • Fel-Pro Head Bolts - $23
  • Fel-Pro Exhaust Manifold Gasket - $8.50
  • Fel-Pro Head Gasket - $29
  • Victor Reinz Exhaust Pipe Flange Gasket - $5
  • Victor Reinz Throttle Body Gasket - $3
  • Intake Manifold Gasket - $8
  • Fel-Pro Valve Cover Gasket - $25
  • Permatex The Right Stuff - $22
  • Permatex Ultra Slick Assembly Lube 2x - $12
  • Cloyes Timing Set - $110
  • J&C Reman Head - $279
  • Luk 04-115 Clutch Set - $116
  • Brute Power flywheel - $60
  • Total: $1,294
Extras:
  • NGK BKR5ESA-11 Spark Plugs - $9
  • CS130 Alternator rebuild kit - $44
  • Aircraft stripper (for cam cover) - $9
  • Carb cleaner/Brake cleaner - $11
  • DB Electrical starter motor - $50
  • GMB water pump - $21
  • Stant 14279 thermostat - $9
  • Gates belt tensioner - $62
  • Coolant hoses - $40
  • Replacements for rounded fasteners - $10
  • Fixed orifice PCV, boot, and grommet - $14
  • Duralast idler pulley - $20
  • Exhaust flex joint - $40
  • Exhaust resonator weld and Cherry Bomb install - $60
  • J/Y front passenger quarter panel and turn signal - $42
  • J/Y ICM and towers - $44
  • VHT high temp, wrinkle plus, black (for cam cover) - $10
  • Total: $496
Grand Total: $2,463
noob5,000,000
Master Standardshifter
Posts: 9380
Joined: Wed Nov 15, 2006 10:57 pm
Cars: 1986 Mazda RX-7 x2
Location: Sterling Heights, Michigan
Contact:

Re: 1995 Saturn SC2 - Rebuilt (lots of pictures)

Post by noob5,000,000 »

Neat! Thanks for sharing.

I've noticed that, despite the fact that many car people like to 'look down' on Saturn, the people who do own Saturns tend to buy from the brand again and often own more than one at once. I'll have to try one out some time, seems like they're a hidden gem.
1986 Mazda RX-7 sport - slowly returning to the Earth
1986 Mazda RX-7 base - Project car, ???, In pieces, turbo parts around.
ClutchDisc
Senior Standardshifter
Posts: 755
Joined: Wed Mar 06, 2013 1:50 pm
Cars: 2009 Mazda 5 2.3L 5MT
Location: Detroit area

Re: 1995 Saturn SC2 - Rebuilt (lots of pictures)

Post by ClutchDisc »

Enjoyed the photos, thanks for sharing.

Did you do all the work yourself?
09 Mazda 5 2.3 5-speed manual 171k
11 Subaru Forester auto :( 113k
92 Ford Mustang LX 5.0 5-speed manual 151k
User avatar
anmasher
Junior Standardshifter
Posts: 12
Joined: Sat May 11, 2013 9:16 pm

Re: 1995 Saturn SC2 - Rebuilt (lots of pictures)

Post by anmasher »

noob5,000,000 wrote:I've noticed that, despite the fact that many car people like to 'look down' on Saturn, the people who do own Saturns tend to buy from the brand again and often own more than one at once. I'll have to try one out some time, seems like they're a hidden gem.
I would agree with you, but note that this is only the S-Series. The Vue, Ion, Outlook, Sky, and Relay were all made somewhat by Saturn but were nothing exceptional. Every other model is imported. The S-Series stands alone in achieving 30+ mpg for all models and is one of the few cars that regularly achieves 400,000+ miles before giving up the ghost. That was the car that they needed to show everybody what they could do. It was awesome, then they became complacent.
ClutchDisc wrote:Did you do all the work yourself?
Everything except machine work (block boring, cranking grinding, that stuff).
94Corolla5Speed
Master Standardshifter
Posts: 6927
Joined: Sun Apr 20, 2008 5:51 pm
Cars: 1994 Corolla, 1990 Miata
Location: Chicago, IL

Re: 1995 Saturn SC2 - Rebuilt (lots of pictures)

Post by 94Corolla5Speed »

Sweet build! Enjoying the pictures and write-up. How is Saturn's twin-cam engine?
User avatar
theholycow
Master Standardshifter
Posts: 16021
Joined: Tue Jun 24, 2008 1:36 pm
Cars: '80 Buick LeSabre 4.1 5MT
Location: Glocester, RI
Contact:

Re: 1995 Saturn SC2 - Rebuilt (lots of pictures)

Post by theholycow »

Wow, that was great!

Anyone who didn't click the link to his transmission rebuild thread, go there now:
http://www.saturnfans.com/forums/showth ... ost1973974

I'm jealous of so much...skills, facilities, equipment, transmission dipstick...I do all my work in the mud of my "lawn" and on a piece of OSB across the top of an old console TV that I call a workbench with hand tools / portable power tools. Obviously I don't rebuild stuff.

When I did my project, I found information that I should use special bolts for the flywheel->crankshaft and clutch cover assembly->flywheel. It looks like you used regular bolts like I did. Any thoughts?

On your crankshaft, "welded thrust surface"...what does that mean? Welder laid a bead over the scored parts to build up material, then the whole thing was reground?

"Flywheel resurfaced. I also had to cut a 1/4", 45° chamfer on the inner edge for clearance with the updated clutch friction discs." -- How did you cut the chamfer? Lathe?

I'm curious why you put so much money into rebuilding that engine. Wouldn't it have been significantly less expensive to replace it, maybe with the one from your old Saturn or even a purchased used engine?
1980 Buick LeSabre 4.1L 5MT

Put your car in your sig!

Learn to launch/FAQs/lugging/misused terms: meta-sig
watkins wrote:Humans have rear-biased AWD. Cows have 4WD
noob5,000,000
Master Standardshifter
Posts: 9380
Joined: Wed Nov 15, 2006 10:57 pm
Cars: 1986 Mazda RX-7 x2
Location: Sterling Heights, Michigan
Contact:

Re: 1995 Saturn SC2 - Rebuilt (lots of pictures)

Post by noob5,000,000 »

theholycow wrote:
Anyone who didn't click the link to his transmission rebuild thread, go there now:
http://www.saturnfans.com/forums/showth ... ost1973974
That was indeed a great read. Looks scary :lol:.
1986 Mazda RX-7 sport - slowly returning to the Earth
1986 Mazda RX-7 base - Project car, ???, In pieces, turbo parts around.
User avatar
bk7794
Master Standardshifter
Posts: 1561
Joined: Tue Jul 05, 2011 3:16 am
Cars: 00 Civic (Stock)
Location: Central CT

Re: 1995 Saturn SC2 - Rebuilt (lots of pictures)

Post by bk7794 »

These cars intrigue me. I went to the Saturn visitors center in Tennessee before it closed. Really sad on how empty it was...

How does the frame hold up in your area? I heard that the rockers and the sub frame rusts to nothing.
2004 Honda Accord 2.4 5 Speed
1989 Ford Taurus SHO 5 speed
User avatar
Shadow
Master Standardshifter
Posts: 3384
Joined: Fri Jan 21, 2011 8:51 am
Location: New York

Re: 1995 Saturn SC2 - Rebuilt (lots of pictures)

Post by Shadow »

anmasher wrote:I've basically driven nothing but Saturn S-Series' the entire time I've been driving. Nothing quite handles like them in my experience...
Hmm.....if you've basically driven nothing but Saturn cars the entire time you've been driving, then I can see why you'd think nothing handles like them. :lol:

Sorry, I just thought that was a funny way for you to start your thread. There's nothing wrong with being enthusiastic about one particular brand. I'm just the opposite--I like to experience lots of different brands and then make my comparisons between them.
Image
User avatar
AHTOXA
Master Standardshifter
Posts: 14693
Joined: Sun Dec 23, 2007 6:31 pm
Cars: '19 4RUNNER TRD ORP
Location: Irving, TX

Re: 1995 Saturn SC2 - Rebuilt (lots of pictures)

Post by AHTOXA »

Great thread - nice writeup.

No experience with these Saturns so I'm not sure how they handle. For all I know, they could be similar to gen1 Neon, which is known as a very good-handling FWD platform and is often autocrossed still.
'19 Toyota 4Runner TRD ORP
'12 Suzuki V-Strom 650
User avatar
anmasher
Junior Standardshifter
Posts: 12
Joined: Sat May 11, 2013 9:16 pm

Re: 1995 Saturn SC2 - Rebuilt (lots of pictures)

Post by anmasher »

theholycow wrote: Anyone who didn't click the link to his transmission rebuild thread, go there now:
http://www.saturnfans.com/forums/showth ... ost1973974
Haha, yes that's an impressive thread; however, it's not mine. Disassembling the transmission to that extent requires a few specialty tools and much more skill than I posses.
When I did my project, I found information that I should use special bolts for the flywheel->crankshaft and clutch cover assembly->flywheel. It looks like you used regular bolts like I did. Any thoughts?
The tiniest bit of loctite isn't a bad idea, but there's nothing wrong with re-using the old bolts.
On your crankshaft, "welded thrust surface"...what does that mean? Welder laid a bead over the scored parts to build up material, then the whole thing was reground?
The thrust bearing takes lateral crank thrust - most significant when you push in the clutch. The crankshaft has a smooth flat circumference that rides on this bearing. The crankshaft and bearing shouldn't be in contact with much force on them unless the clutch is pushed in. Sitting at a stop light in 1st, clutch in, slowly eats the crankshaft and bearing. It is this surface that had a weld built up and then was re-ground. Thrust bearing. Thrust surface.
"Flywheel resurfaced. I also had to cut a 1/4", 45° chamfer on the inner edge for clearance with the updated clutch friction discs." -- How did you cut the chamfer? Lathe?
3 axis mill. Picked up several points around the outside, then cut the specified circle however far in it was supposed to be. When that came out off-center, it indicated that the flywheel was out of balance.
I'm curious why you put so much money into rebuilding that engine. Wouldn't it have been significantly less expensive to replace it, maybe with the one from your old Saturn or even a purchased used engine?
No other reason than that I wanted to. You gotta have something to drain all your time and money, right? It did come out to about the same as a nicer Craigslist Saturn, but any of those would have 100k+ miles.
Post Reply